本文档的部署路线图为:
- 离线部署 TiDB v5.3.0(
TiDB*3、PD*3、TiKV*3); - 源码部署 Haproxy v2.5.0
- 离线升级 TiDB v5.3.0 至 TiDB v5.4.2;
- 缩扩容 TiDB Server、PD
- 扩缩容 TiKV、TiFlash
- 部署 TiSpark(
TiSpark*3) - 离线升级 TiDB v5.4.2 至 TiDB v6.1
1. 离线部署
1.1. 拓扑规划
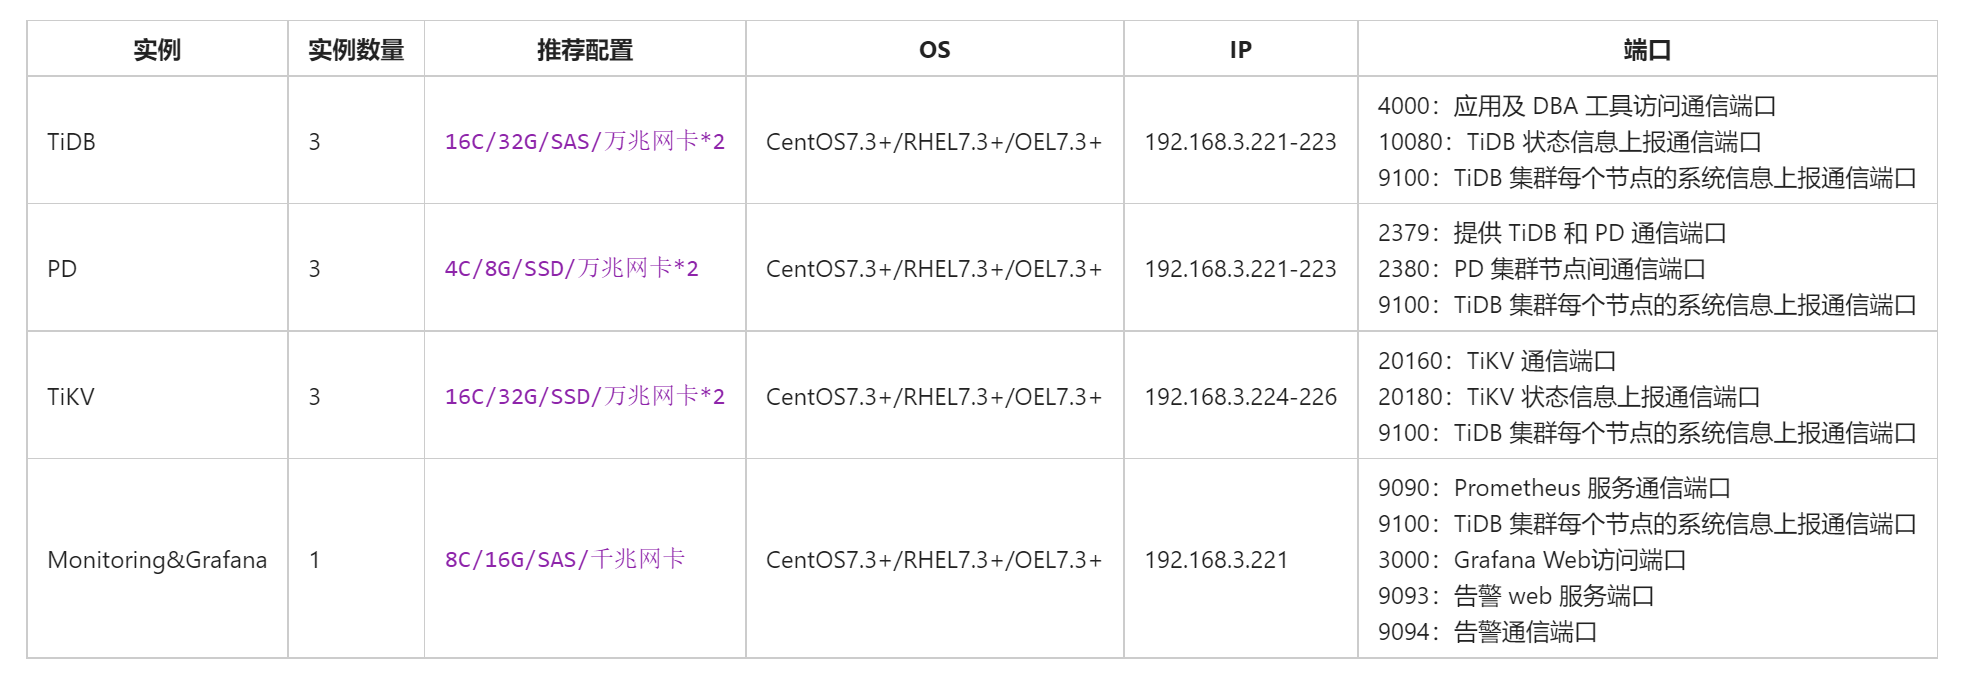
1.2. 端口开放
| 组件 | 默认端口 | 说明 |
|---|---|---|
| TiDB | 4000 | 应用及 DBA 工具访问通信端口 |
| TiDB | 10080 | TiDB 状态信息上报通信端口 |
| TiKV | 20160 | TiKV 通信端口 |
| TiKV | 20180 | TiKV 状态信息上报通信端口 |
| PD | 2379 | 提供 TiDB 和 PD 通信端口 |
| PD | 2380 | PD 集群节点间通信端口 |
| TiFlash | 9000 | TiFlash TCP 服务端口 |
| TiFlash | 8123 | TiFlash HTTP 服务端口 |
| TiFlash | 3930 | TiFlash RAFT 服务和 Coprocessor 服务端口 |
| TiFlash | 20170 | TiFlash Proxy 服务端口 |
| TiFlash | 20292 | Prometheus 拉取 TiFlash Proxy metrics 端口 |
| TiFlash | 8234 | Prometheus 拉取 TiFlash metrics 端口 |
| Pump | 8250 | Pump 通信端口 |
| Drainer | 8249 | Drainer 通信端口 |
| CDC | 8300 | CDC 通信接口 |
| Prometheus | 9090 | Prometheus 服务通信端口 |
| Node_exporter | 9100 | TiDB 集群每个节点的系统信息上报通信端口 |
| Blackbox_exporter | 9115 | Blackbox_exporter 通信端口,用于 TiDB 集群端口监控 |
| Grafana | 3000 | Web 监控服务对外服务和客户端(浏览器)访问端口 |
| Alertmanager | 9093 | 告警 web 服务端口 |
| Alertmanager | 9094 | 告警通信端口 |
1.3. 主机配置
1.3.1. 更换yum源
~]# cp /etc/yum.repos.d/CentOS-Base.repo /etc/yum.repos.d/CentOS-Base.repo.bak
~]# wget -O /etc/yum.repos.d/CentOS-Base.repo http://mirrors.aliyun.com/repo/Centos-7.repo
~]# yum clean all
~]# yum makecache
1.3.2. ssh互信及免密登录
中控机设置ront用户互信,免密登录各节点。
~]# ssh-keygen -t rsa
~]# ssh-copy-id root@192.168.3.221
~]# ssh-copy-id root@192.168.3.222
~]# ssh-copy-id root@192.168.3.223
~]# ssh-copy-id root@192.168.3.224
~]# ssh-copy-id root@192.168.3.225
~]# ssh-copy-id root@192.168.3.226
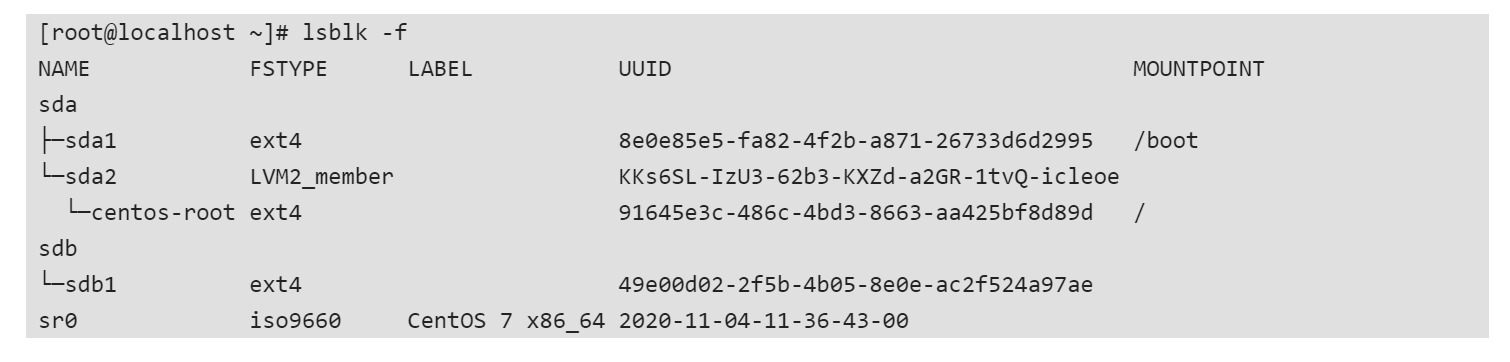
1.3.3. TiKV数据盘优化
以 /dev/sdb 为例
-
分区格式化

-
查看分区的UUID
这里 sdb1 的 UUID 为 49e00d02-2f5b-4b05-8e0e-ac2f524a97ae
- 分区挂载
编辑 /etc/fstab 文件,添加 nodelalloc 挂载参数。
~]# echo "UUID=49e00d02-2f5b-4b05-8e0e-ac2f524a97ae /tidb-data ext4 defaults,nodelalloc,noatime 0 2" >> /etc/fstab

~]# mkdir /tidb-data && mount /tidb-data

~]# mount -t ext4
/dev/mapper/centos-root on / type ext4 (rw,relatime,seclabel,data=ordered)
/dev/sda1 on /boot type ext4 (rw,relatime,seclabel,data=ordered)
/dev/sdb1 on /tidb-data type ext4 (rw,noatime,seclabel,nodelalloc,data=ordered)
1.3.4. 关闭Swap
for node_ip in 192.168.3.221 192.168.3.222 192.168.3.223 192.168.3.224 192.168.3.225 192.168.3.226
  do
    echo ">>> ${node_ip}"
    ssh root@${node_ip} "echo \"vm.swappiness = 0\">> /etc/sysctl.conf"
    ssh root@${node_ip} "swapoff -a && swapon -a"
    ssh root@${node_ip} "sysctl -p"
  done
一起执行 swapoff -a 和 swapon -a 命令是为了刷新 swap,将 swap 里的数据转储回内存,并清空 swap 里的数据。
1.3.5. 关闭 SElinux
for node_ip in 192.168.3.221 192.168.3.222 192.168.3.223 192.168.3.224 192.168.3.225 192.168.3.226
  do
    echo ">>> ${node_ip}"
    ssh root@${node_ip} "setenforce 0"
    ssh root@${node_ip} "sed -i 's#SELINUX=enforcing#SELINUX=disabled#g' /etc/selinux/config"
    ssh root@${node_ip} "sed -i 's/^SELINUX=.*/SELINUX=disabled/' /etc/selinux/config"
  done
1.3.6. 关闭防火墙
~]# firewall-cmd --state
~]# systemctl status firewalld.service

~]# systemctl stop firewalld.service
~]# systemctl disable firewalld.service
1.3.7. 时间同步
- 确认时区
~]# cp /usr/share/zoneinfo/Asia/Shanghai /etc/localtime
- 时钟同步
TiDB 是一套分布式数据库系统,需要节点间保证时间的同步,从而确保 ACID 模型的事务线性一致性。可以通过互联网中的 pool.ntp.org 授时服务来保证节点的时间同步,也可以使用离线环境自己搭建的 NTP 服务来解决授时。
这里以向外网pool.ntp.org时间服务器同步为例。
~]# yum install ntp ntpdate
~]# ntpdate pool.ntp.org
~]# systemctl start ntpd.service
~]# systemctl enable ntpd.service
1.3.8. 系统优化
需要优化的项目有:
- 关闭透明大页( Transparent Huge Pages) never表示已关闭THP
~]# cat /sys/kernel/mm/transparent_hugepage/enabled
[always] madvise never
- 优化IO调度 假设数据盘为
/sdb,需修改调度为noop
~]# cat /sys/block/sdb/queue/scheduler
noop [deadline] cfq
查看数据盘分区的唯一标识 ID_SERIAL 。
~]# udevadm info --name=/dev/sdb | grep ID_SERIAL
- CPU节能策略
The governor "powersave"表示cpufreq的节能策略使用powersave,需要调整为performance策略。如果是虚拟机或者云主机,则不需要调整,命令输出通常为Unable to determine current policy。
~]# cpupower frequency-info --policy
analyzing CPU 0:
current policy: frequency should be within 1.20 GHz and 3.10 GHz.
              The governor "powersave" may decide which speed to use within this range.
1.3.8.1. 使用 tuned(推荐)
- 查看当前tuned策略
~]# tuned-adm list
Available profiles:
- balanced                    - General non-specialized tuned profile
- desktop                     - Optimize for the desktop use-case
- hpc-compute                 - Optimize for HPC compute workloads
- latency-performance         - Optimize for deterministic performance at the cost of increased power consumption
- network-latency             - Optimize for deterministic performance at the cost of increased power consumption, focused on low latency network performance
- network-throughput          - Optimize for streaming network throughput, generally only necessary on older CPUs or 40G+ networks
- powersave                   - Optimize for low power consumption
- throughput-performance      - Broadly applicable tuning that provides excellent performance across a variety of common server workloads
- virtual-guest               - Optimize for running inside a virtual guest
- virtual-host                - Optimize for running KVM guests
Current active profile: virtual-guest
- 创建新的tuned策略
在当前的tuned策略 balanced 基础上,追加新的策略。
~]# mkdir /etc/tuned/balanced-tidb-optimal/
~]# vi /etc/tuned/balanced-tidb-optimal/tuned.conf

[main]
include=balanced

[cpu]
governor=performance

[vm]
transparent_hugepages=never

[disk]
devices_udev_regex=(ID_SERIAL=0QEMU_QEMU_HARDDISK_drive-scsi1)
elevator=noop
多个磁盘的ID_SERIAL用竖线分割,如:
[disk]
devices_udev_regex=(ID_SERIAL=0QEMU_QEMU_HARDDISK_drive-scsi1)|(ID_SERIAL=36d0946606d79f90025f3e09a0c1f9e81)
elevator=noop
- 应用新的策略
~]# tuned-adm profile balanced-tidb-optimal
- 验证优化结果
cat /sys/kernel/mm/transparent_hugepage/enabled && \
cat /sys/block/sdb/queue/scheduler && \
cpupower frequency-info --policy
若tuned关闭THP不生效,可通过如下方式关闭:
- 查看默认启动内核
~]# grubby --default-kernel
/boot/vmlinuz-3.10.0-1160.71.1.el7.x86_64
- 追加关闭THP参数
~]# grubby --args="transparent_hugepage=never" --update-kernel /boot/vmlinuz-3.10.0-1160.71.1.el7.x86_64
~]# grubby --info /boot/vmlinuz-3.10.0-1160.71.1.el7.x86_64
index=0
kernel=/boot/vmlinuz-3.10.0-1160.71.1.el7.x86_64
args="ro crashkernel=auto spectre_v2=retpoline rd.lvm.lv=centos/root rhgb quiet LANG=en_US.UTF-8 transparent_hugepage=never"
root=/dev/mapper/centos-root
initrd=/boot/initramfs-3.10.0-1160.71.1.el7.x86_64.img
title=CentOS Linux (3.10.0-1160.71.1.el7.x86_64) 7 (Core)
- 立即关闭THP
~]# echo never > /sys/kernel/mm/transparent_hugepage/enabled
~]# echo never > /sys/kernel/mm/transparent_hugepage/defrag
1.3.8.2. 内核优化
for node_ip in 192.168.3.221 192.168.3.222 192.168.3.223 192.168.3.224 192.168.3.225 192.168.3.226
  do
    echo ">>> ${node_ip}"
    ssh root@${node_ip} "echo \"fs.file-max = 1000000\"       >> /etc/sysctl.conf"
    ssh root@${node_ip} "echo \"net.core.somaxconn = 32768\"  >> /etc/sysctl.conf"
    ssh root@${node_ip} "echo \"net.ipv4.tcp_tw_recycle = 0\" >> /etc/sysctl.conf"
    ssh root@${node_ip} "echo \"net.ipv4.tcp_syncookies = 0\" >> /etc/sysctl.conf"
    ssh root@${node_ip} "echo \"vm.overcommit_memory = 1\"    >> /etc/sysctl.conf"
    ssh root@${node_ip} "sysctl -p"
  done
1.3.9. 用户创建及资源限制
1.3.9.1. 创建用户
for node_ip in 192.168.3.221 192.168.3.222 192.168.3.223 192.168.3.224 192.168.3.225 192.168.3.226
  do
    echo ">>> ${node_ip}"
    ssh root@${node_ip} "useradd tidb && passwd tidb"
  done
tidb用户密码 tidb123
1.3.9.2. 资源限制
for node_ip in 192.168.3.221 192.168.3.222 192.168.3.223 192.168.3.224 192.168.3.225 192.168.3.226
  do
    echo ">>> ${node_ip}"
    ssh root@${node_ip} "echo \"tidb  soft nofile  1000000\" >> /etc/security/limits.conf"
    ssh root@${node_ip} "echo \"tidb  hard nofile  1000000\" >> /etc/security/limits.conf"
    ssh root@${node_ip} "echo \"tidb  soft stack   32768\"   >> /etc/security/limits.conf"
    ssh root@${node_ip} "echo \"tidb  hard stack   32768\"   >> /etc/security/limits.conf"
  done
1.3.9.3. sudo权限
为 tidb 用户增加免密 sudo 权限
for node_ip in 192.168.3.221 192.168.3.222 192.168.3.223 192.168.3.224 192.168.3.225 192.168.3.226
  do
    echo ">>> ${node_ip}"
    ssh root@${node_ip} "echo \"tidb ALL=(ALL) NOPASSWD: ALL\" >> /etc/sudoers"
  done
tidb用户登录各目标节点,确认执行 sudo - root 无需输入密码,即表示添加成功。
1.3.9.4. 免密登录
tidb用户登录中控机执行:
~]$ id
uid=1000(tidb) gid=1000(tidb) groups=1000(tidb) context=unconfined_u:unconfined_r:unconfined_t:s0-s0:c0.c1023
~]$ ssh-keygen -t rsa
~]$ ssh-copy-id tidb@192.168.3.221
~]$ ssh-copy-id tidb@192.168.3.222
~]$ ssh-copy-id tidb@192.168.3.223
~]$ ssh-copy-id tidb@192.168.3.224
~]$ ssh-copy-id tidb@192.168.3.225
~]$ ssh-copy-id tidb@192.168.3.226
验证tidb免密登录
~]$ id
uid=1000(tidb) gid=1000(tidb) groups=1000(tidb) context=unconfined_u:unconfined_r:unconfined_t:s0-s0:c0.c1023

~]$
for node_ip in 192.168.3.221 192.168.3.222 192.168.3.223 192.168.3.224 192.168.3.225 192.168.3.226
  doecho ">>> ${node_ip}"
    ssh tidb@${node_ip} "date"done
1.3.10. 安装numactl
1.3.10.1. 配置本地 YUM
- 镜像挂载
~]# mkdir -p /mnt/yum
~]# mount -o loop /dev/cdrom /mnt/yum
- 配置本地 repo 源
~]# cat > /etc/yum.repos.d/local.repo << EOF
[Packages]
name=Redhat Enterprise Linux 7.9
baseurl=file:///mnt/yum/
enabled=1
gpgcheck=0
gpgkey=file:///mnt/yum/RPM-GPG-KEY-redhat-release
EOF
- 生成 YUM 缓存
~]# yum clean all
~]# yum makecache
1.3.10.2. 安装 numactl
for node_ip in 192.168.3.221 192.168.3.222 192.168.3.223 192.168.3.224 192.168.3.225 192.168.3.226
  do
    echo ">>> ${node_ip}"
    ssh root@${node_ip} "yum -y install numactl"
  done
1.4. 准备离线镜像包
可直接在tidb官网下载TiDB Server离线镜像包,或根据需要利用打包工具自助打包离线镜像包。
1.4.1. 方式一:下载 TiDB server 离线镜像包(包含 TiUP 离线组件包)
将离线镜像包上传至中控机
https://pingcap.com/zh/product#SelectProduct
wget https://download.pingcap.org/tidb-community-server-v5.3.0-linux-amd64.tar.gz
1.4.2. 方式二:手动打包离线镜像包
- 安装 TiUP 工具:
curl --proto '=https' --tlsv1.2 -sSf https://tiup-mirrors.pingcap.com/install.sh | sh
source .bash_profile
which tiup
- 用 TiUP 制作离线镜像
tiup mirror clone tidb-community-server-${version}-linux-amd64 ${version} --os=linux --arch=amd64
tar czvf tidb-community-server-${version}-linux-amd64.tar.gz tidb-community-server-${version}-linux-amd64
此时,tidb-community-server-${version}-linux-amd64.tar.gz 就是一个独立的离线环境包。
1.4.2.1. 调整离线包内容
- 可通过参数指定具体的组件和版本等信息,获得不完整的离线镜像。
tiup mirror clone tiup-custom-mirror-v1.7.0 --tiup v1.7.0 --cluster v1.7.0
tar czvf tiup-custom-mirror-v1.7.0.tar.gz tiup-custom-mirror-v1.7.0
将定制的离线包上传至离线的中控机
- 在隔离环境的中控机上,查看当前使用的离线镜像路径。
tiup mirror show
如果提示 show 命令不存在,可能当前使用的是较老版本的 TiUP。此时可以通过查看 $HOME/.tiup/tiup.toml 获得正在使用的镜像地址。将此镜像地址记录下来,后续步骤中将以变量 ${base_mirror} 指代此镜像地址。
- 将不完整的离线镜像合并到已有的离线镜像中:
# 将当前离线镜像中的 keys 目录复制到 $HOME/.tiup 目录中:
cp -r ${base_mirror}/keys $HOME/.tiup/

# 使用 TiUP 命令将不完整的离线镜像合并到当前使用的镜像中:
tiup mirror merge tiup-custom-mirror-v1.7.0
通过 tiup list 命令检查执行结果
1.5. 离线部署TiDB集群
1.5.1. 部署TiUP组件
tidb用户进行TiUP组件部署
~]$ id
uid=1000(tidb) gid=1000(tidb) groups=1000(tidb) context=unconfined_u:unconfined_r:unconfined_t:s0-s0:c0.c1023

~]$ sudo chown tidb:tidb tidb-community-server-v5.3.0-linux-amd64.tar.gz
~]$ ll
total 1942000
-rw-r--r--. 1 tidb tidb 1988601700 Nov 29  2021 tidb-community-server-v5.3.0-linux-amd64.tar.gz

~]$ tar -xzvf tidb-community-server-v5.3.0-linux-amd64.tar.gz
~]$ sh tidb-community-server-v5.3.0-linux-amd64/local_install.sh
~]$ source /home/tidb/.bash_profile
local_install.sh 脚本会自动执行 tiup mirror set tidb-community-server-v5.3.0-linux-amd64 命令将当前镜像地址设置为 tidb-community-server-v5.3.0-linux-amd64。
若需将镜像切换到其他目录,可以通过手动执行 tiup mirror set <mirror-dir> 进行切换。如果需要切换到在线环境,可执行 tiup mirror set https://tiup-mirrors.pingcap.com 。
1.5.2. 准备拓扑文件
~]$ tiup cluster template |grep -Ev '^\s*#|^
生成的默认拓扑配置如下:
global:
  user: "tidb"
  ssh_port: 22
  deploy_dir: "/tidb-deploy"
  data_dir: "/tidb-data"
  arch: "amd64"
monitored:
  node_exporter_port: 9100
  blackbox_exporter_port: 9115
pd_servers:
  - host: 10.0.1.11
  - host: 10.0.1.12
  - host: 10.0.1.13
tidb_servers:
  - host: 10.0.1.14
  - host: 10.0.1.15
  - host: 10.0.1.16
tikv_servers:
  - host: 10.0.1.17
  - host: 10.0.1.18
  - host: 10.0.1.19
tiflash_servers:
  - host: 10.0.1.20
  - host: 10.0.1.21
monitoring_servers:
  - host: 10.0.1.22
grafana_servers:
  - host: 10.0.1.22
alertmanager_servers:
  - host: 10.0.1.22
根据实际环境,修改配置文件。
global:
  user: "tidb"
  ssh_port: 22
  deploy_dir: "/tidb-deploy"
  data_dir: "/tidb-data"
  arch: "amd64"
monitored:
  node_exporter_port: 9100
  blackbox_exporter_port: 9115
pd_servers:
  - host: 192.168.3.221
  - host: 192.168.3.222
  - host: 192.168.3.223
tidb_servers:
  - host: 192.168.3.221
  - host: 192.168.3.222
  - host: 192.168.3.223
tikv_servers:
  - host: 192.168.3.224
  - host: 192.168.3.225
  - host: 192.168.3.226
monitoring_servers:
  - host: 192.168.3.221
grafana_servers:
  - host: 192.168.3.221
alertmanager_servers:
  - host: 192.168.3.221
1.5.3. 环境校验
- 环境检查 生产环境,需确保所有检查项都为pass
~]$ tiup cluster check ./topology.yaml --user tidb
...
Node           Check       Result  Message
----           -----       ------  -------
192.168.3.223  os-version  Pass    OS is CentOS Linux 7 (Core) 7.9.2009
192.168.3.223  cpu-cores   Pass    number of CPU cores / threads: 4
192.168.3.223  memory      Pass    memory size is 4096MB
192.168.3.223  selinux     Fail    SELinux is not disabled
192.168.3.223  thp         Fail    THP is enabled, please disable it for best performance
192.168.3.223  command     Pass    numactl: policy: default
192.168.3.224  os-version  Pass    OS is CentOS Linux 7 (Core) 7.9.2009
192.168.3.224  cpu-cores   Pass    number of CPU cores / threads: 4
192.168.3.224  memory      Pass    memory size is 4096MB
192.168.3.224  selinux     Fail    SELinux is not disabled
192.168.3.224  thp         Fail    THP is enabled, please disable it for best performance
192.168.3.224  command     Pass    numactl: policy: default
192.168.3.225  os-version  Pass    OS is CentOS Linux 7 (Core) 7.9.2009
192.168.3.225  cpu-cores   Pass    number of CPU cores / threads: 4
192.168.3.225  memory      Pass    memory size is 4096MB
192.168.3.225  selinux     Fail    SELinux is not disabled
192.168.3.225  thp         Fail    THP is enabled, please disable it for best performance
192.168.3.225  command     Pass    numactl: policy: default
192.168.3.226  os-version  Pass    OS is CentOS Linux 7 (Core) 7.9.2009
192.168.3.226  cpu-cores   Pass    number of CPU cores / threads: 4
192.168.3.226  memory      Pass    memory size is 4096MB
192.168.3.226  selinux     Fail    SELinux is not disabled
192.168.3.226  thp         Fail    THP is enabled, please disable it for best performance
192.168.3.226  command     Pass    numactl: policy: default
192.168.3.221  os-version  Pass    OS is CentOS Linux 7 (Core) 7.9.2009
192.168.3.221  cpu-cores   Pass    number of CPU cores / threads: 4
192.168.3.221  memory      Pass    memory size is 4096MB
192.168.3.221  selinux     Fail    SELinux is not disabled
192.168.3.221  thp         Fail    THP is enabled, please disable it for best performance
192.168.3.221  command     Pass    numactl: policy: default
192.168.3.222  os-version  Pass    OS is CentOS Linux 7 (Core) 7.9.2009
192.168.3.222  cpu-cores   Pass    number of CPU cores / threads: 4
192.168.3.222  memory      Pass    memory size is 4096MB
192.168.3.222  selinux     Fail    SELinux is not disabled
192.168.3.222  thp         Fail    THP is enabled, please disable it for best performance
192.168.3.222  command     Pass    numactl: policy: default
- 环境修复
~]$ tiup cluster check ./topology.yaml --apply --user root
1.5.4. 集群部署
~]$ id
uid=1000(tidb) gid=1000(tidb) groups=1000(tidb)

~]$ tiup cluster deploy kruidb-cluster v5.3.0 ./topology.yaml --user tidb
Starting component `cluster`: /home/tidb/.tiup/components/cluster/v1.7.0/tiup-cluster deploy kruidb-cluster v5.3.0 ./topology.yaml --user tidb

+ Detect CPU Arch
+ Detect CPU Arch
  - Detecting node 192.168.3.221 ... Done
  - Detecting node 192.168.3.222 ... Done
  - Detecting node 192.168.3.223 ... Done
  - Detecting node 192.168.3.224 ... Done
  - Detecting node 192.168.3.225 ... Done
  - Detecting node 192.168.3.226 ... Done
Please confirm your topology:
Cluster type:    tidb
Cluster name:    kruidb-cluster
Cluster version: v5.3.0
Role          Host           Ports        OS/Arch       Directories
----          ----           -----        -------       -----------
pd            192.168.3.221  2379/2380    linux/x86_64  /tidb-deploy/pd-2379,/tidb-data/pd-2379
pd            192.168.3.222  2379/2380    linux/x86_64  /tidb-deploy/pd-2379,/tidb-data/pd-2379
pd            192.168.3.223  2379/2380    linux/x86_64  /tidb-deploy/pd-2379,/tidb-data/pd-2379
tikv          192.168.3.224  20160/20180  linux/x86_64  /tidb-deploy/tikv-20160,/tidb-data/tikv-20160
tikv          192.168.3.225  20160/20180  linux/x86_64  /tidb-deploy/tikv-20160,/tidb-data/tikv-20160
tikv          192.168.3.226  20160/20180  linux/x86_64  /tidb-deploy/tikv-20160,/tidb-data/tikv-20160
tidb          192.168.3.221  4000/10080   linux/x86_64  /tidb-deploy/tidb-4000
tidb          192.168.3.222  4000/10080   linux/x86_64  /tidb-deploy/tidb-4000
tidb          192.168.3.223  4000/10080   linux/x86_64  /tidb-deploy/tidb-4000
prometheus    192.168.3.221  9090         linux/x86_64  /tidb-deploy/prometheus-9090,/tidb-data/prometheus-9090
grafana       192.168.3.221  3000         linux/x86_64  /tidb-deploy/grafana-3000
alertmanager  192.168.3.221  9093/9094    linux/x86_64  /tidb-deploy/alertmanager-9093,/tidb-data/alertmanager-9093
Attention:
    1. If the topology is not what you expected, check your yaml file.
    2. Please confirm there is no port/directory conflicts in same host.
Do you want to continue? [y/N]: (default=N) y
...

        Enable 192.168.3.226 successEnable 192.168.3.224 successEnable 192.168.3.225 successEnable 192.168.3.222 success
Cluster `kruidb-cluster` deployed successfully, you can start it with command: `tiup cluster start kruidb-cluster`
1.6. 初始化集群
~]$ tiup cluster start kruidb-cluster

...
+ [ Serial ] - UpdateTopology: cluster=kruidb-cluster
Started cluster `kruidb-cluster` successfully
可通过 tiup cluster start kruidb-cluster --init 在初始化集群时,为root用户生成随机密码(只显示一次)。省略 DISCOURSE_PLACEHOLDER_70 参数,则为root用户指定空密码。
1.7. 检查TiDB集群
1.7.1. 查看集群
DISCOURSE_PLACEHOLDER_71
~]$ tiup cluster display kruidb-cluster
Starting component `cluster`: /home/tidb/.tiup/components/cluster/v1.7.0/tiup-cluster display kruidb-cluster
Cluster type:       tidb
Cluster name:       kruidb-cluster
Cluster version:    v5.3.0
Deploy user:        tidb
SSH type:           builtin
Dashboard URL:      http://192.168.3.222:2379/dashboard
ID                   Role          Host           Ports        OS/Arch       Status  Data Dir                      Deploy Dir
--                   ----          ----           -----        -------       ------  --------                      ----------
192.168.3.221:9093   alertmanager  192.168.3.221  9093/9094    linux/x86_64  Up      /tidb-data/alertmanager-9093  /tidb-deploy/alertmanager-9093
192.168.3.221:3000   grafana       192.168.3.221  3000         linux/x86_64  Up      -                             /tidb-deploy/grafana-3000
192.168.3.221:2379   pd            192.168.3.221  2379/2380    linux/x86_64  Up      /tidb-data/pd-2379            /tidb-deploy/pd-2379
192.168.3.222:2379   pd            192.168.3.222  2379/2380    linux/x86_64  Up|UI   /tidb-data/pd-2379            /tidb-deploy/pd-2379
192.168.3.223:2379   pd            192.168.3.223  2379/2380    linux/x86_64  Up|L    /tidb-data/pd-2379            /tidb-deploy/pd-2379
192.168.3.221:9090   prometheus    192.168.3.221  9090         linux/x86_64  Up      /tidb-data/prometheus-9090    /tidb-deploy/prometheus-9090
192.168.3.221:4000   tidb          192.168.3.221  4000/10080   linux/x86_64  Up      -                             /tidb-deploy/tidb-4000
192.168.3.222:4000   tidb          192.168.3.222  4000/10080   linux/x86_64  Up      -                             /tidb-deploy/tidb-4000
192.168.3.223:4000   tidb          192.168.3.223  4000/10080   linux/x86_64  Up      -                             /tidb-deploy/tidb-4000
192.168.3.224:20160  tikv          192.168.3.224  20160/20180  linux/x86_64  Up      /tidb-data/tikv-20160         /tidb-deploy/tikv-20160
192.168.3.225:20160  tikv          192.168.3.225  20160/20180  linux/x86_64  Up      /tidb-data/tikv-20160         /tidb-deploy/tikv-20160
192.168.3.226:20160  tikv          192.168.3.226  20160/20180  linux/x86_64  Up      /tidb-data/tikv-20160         /tidb-deploy/tikv-20160
1.7.2. 检查集群配置
可通过 tiup cluster edit-config <集群名> 修改集群运行的配置信息,该命令会自动收集各节点的配置项。
DISCOURSE_PLACEHOLDER_74
2. 部署Haproxy
将haproxy部署于192.168.3.221节点
2.1. 依赖包安装
~]# yum -y install epel-release gcc systemd-develInstalled:
  epel-release.noarch 0:7-11                      gcc.x86_64 0:4.8.5-44.el7                      systemd-devel.x86_64 0:219-78.el7_9.5

Dependency Installed:
  cpp.x86_64 0:4.8.5-44.el7     glibc-devel.x86_64 0:2.17-326.el7_9   glibc-headers.x86_64 0:2.17-326.el7_9   kernel-headers.x86_64 0:3.10.0-1160.71.1.el7
  libmpc.x86_64 0:1.0.1-3.el7   mpfr.x86_64 0:3.1.1-4.el7

Complete!
2.2. 安装Haproxy
~]# wget https://github.com/haproxy/haproxy/archive/refs/tags/v2.5.0.zip
~]# unzip v2.5.0
- 编译安装
~]# cd haproxy-2.5.0
~]# make clean
~]# make -j 8 TARGET=linux-glibc USE_THREAD=1
~]# make PREFIX=/usr/local/haproxy_v2.5.0 SBINDIR=/usr/local/haproxy_v2.5.0/bin install
- 安装后配置
~]# ln -s /usr/local/haproxy_v2.5.0 /usr/local/haproxy
~]# echo 'export PATH=/usr/local/haproxy/bin:$PATH' >> /etc/profile
~]# source /etc/profile
~]# which haproxy
/usr/local/haproxy/bin/haproxy
## 2.3. 配置Haproxy

通过YUM安装,会生成配置模板,也可根据实际场景自定义如下配置项:

```bash
global                                     # 全局配置。
   log         127.0.0.1 local2            # 定义全局的 syslog 服务器,最多可以定义两个。
   chroot      /var/lib/haproxy            # 更改当前目录并为启动进程设置超级用户权限,从而提高安全性。
   pidfile     /var/run/haproxy.pid        # 将 HAProxy 进程的 PID 写入 pidfile。
   maxconn     4096                        # 单个 HAProxy 进程可接受的最大并发连接数,等价于命令行参数 "-n"。
   nbthread    48                          # 最大线程数。线程数的上限与 CPU 数量相同。
   user        haproxy                     # 同 UID 参数。group       haproxy                     # 同 GID 参数,建议使用专用用户组。
   daemon                                  # 让 HAProxy 以守护进程的方式工作于后台,等同于命令行参数“-D”的功能。当然,也可以在命令行中用“-db”参数将其禁用。
   stats socket /var/lib/haproxy/stats mode 600 level admin  # 统计信息保存位置。

defaults                                   # 默认配置。
   log global                              # 日志继承全局配置段的设置。
   retries 2                               # 向上游服务器尝试连接的最大次数,超过此值便认为后端服务器不可用。
   timeout connect  2s                     # HAProxy 与后端服务器连接超时时间。如果在同一个局域网内,可设置成较短的时间。
   timeout client 30000s                   # 客户端与 HAProxy 连接后,数据传输完毕,即非活动连接的超时时间。
   timeout server 30000s                   # 服务器端非活动连接的超时时间。

listen admin_stats                         # frontend 和 backend 的组合体,此监控组的名称可按需进行自定义。
   bind 0.0.0.0:8080                       # 监听端口。
   mode http                               # 监控运行的模式,此处为 `http` 模式。
   option httplog                          # 开始启用记录 HTTP 请求的日志功能。
   maxconn 10                              # 最大并发连接数。
   stats refresh 30s                       # 每隔 30 秒自动刷新监控页面。
   stats uri /haproxy                      # 监控页面的 URL。
   stats realm HAProxy                     # 监控页面的提示信息。
   stats auth admin:pingcap123             # 监控页面的用户和密码,可设置多个用户名。
   stats hide-version                      # 隐藏监控页面上的 HAProxy 版本信息。
   stats  admin if TRUE                    # 手工启用或禁用后端服务器(HAProxy 1.4.9 及之后版本开始支持)。

listen tidb-cluster                        # 配置 database 负载均衡。
   bind 0.0.0.0:13390                      # 浮动 IP 和 监听端口,修改默认端口3390为13390
   mode tcp                                # HAProxy 要使用第 4 层的传输层。
   balance leastconn                       # 连接数最少的服务器优先接收连接。`leastconn` 建议用于长会话服务,例如 LDAP、SQL、TSE 等,而不是短会话协议,如 HTTP。该算法是动态的,对于启动慢的服务器,服务器权重会在运行中作调整。
   server tidb-1 192.168.3.221:4000 check inter 2000 rise 2 fall 3      # 检测 4000 端口,检测频率为每 2000 毫秒一次。如果 2 次检测为成功,则认为服务器可用;如果 3 次检测为失败,则认为服务器不可用。
   server tidb-2 192.168.3.222:4000 check inter 2000 rise 2 fall 3
   server tidb-3 192.168.3.223:4000 check inter 2000 rise 2 fall 3
将配置文件保存为 /etc/haproxy/haproxy.cfg ,验证配置文件正确性。
DISCOURSE_PLACEHOLDER_81
2.4. 启停Haproxy
~]# /usr/local/haproxy/bin/haproxy -f haproxy.cfg
2.4.1. 设置开机自启
~]# cp /root/haproxy-2.5.0/examples/haproxy.init /etc/init.d/haproxy
~]# chmod +x /etc/init.d/haproxy
~]# ln -s /usr/local/haproxy/bin/haproxy /usr/sbin/
~]# chkconfig --add haproxy
~]# chkconfig haproxy on
~]# systemctl enable haproxy
haproxy.service is not a native service, redirecting to /sbin/chkconfig.
Executing /sbin/chkconfig haproxy on
~]# systemctl restart haproxy
~]# systemctl status haproxy
~]# systemctl start haproxy
~]# systemctl stop haproxy
3. 连接 TiDB
3.1. 安装mysql客户端
~]# wget https://dev.mysql.com/get/mysql80-community-release-el7-6.noarch.rpm
~]# rpm -ivh mysql80-community-release-el7-6.noarch.rpm
~]# rpm --import https://repo.mysql.com/RPM-GPG-KEY-mysql-2022
~]# yum makecache
~]# yum install -y mysql
3.2. 连接 TiDB
3.2.1. 直连tidb
tidb默认用户root,密码为空。
~]# mysql -P4000 -uroot -h 192.168.3.222
3.2.2. 通过 haproxy 连接
~]# mysql -P13390 -uroot -h 192.168.3.221
3.3. 用户管理
3.3.1. 修改密码
~]# mysql -P13390 -uroot -h 192.168.3.221
mysql> CREATE USER 'admin'@'%' IDENTIFIED BY 'admin';
mysql> GRANT ALL PRIVILEGES ON *.* TO 'admin'@'%' WITH GRANT OPTION;
mysql> ALTER USER 'root'@'%' IDENTIFIED BY 'root';
mysql> FLUSH PRIVILEGES;
3.3.2. 忘记密码
修改配置文件,在 security 部分添加 skip-grant-table :
DISCOURSE_PLACEHOLDER_90
使用修改之后的配置启动 TiDB,然后使用 root 登录后修改密码:
~]# mysql -h 127.0.0.1 -P 4000 -u root
设置 skip-grant-table 之后,启动 TiDB 进程会增加操作系统用户检查,只有操作系统的 root 用户才能启动 TiDB 进程。
4. TiDB集群升级
4.1. 升级至 5.4.x 版本
升级文档可参考官网链接: https://docs.pingcap.com/zh/tidb/v5.4/upgrade-tidb-using-tiup
4.1.1. 5.4.x 关键特性
发版日期:2022 年 2 月 15 日,5.4.0 关键特性如下:
-
支持 GBK 字符集
-
支持索引合并 (Index Merge) 数据访问方法,能够合并多个列上索引的条件过滤结果
-
支持通过 session 变量实现有界限过期数据读取
-
支持统计信息采集配置持久化
-
支持使用 Raft Engine 作为 TiKV 的日志存储引擎【实验特性】
-
优化备份对集群的影响
-
支持 Azure Blob Storage 作为备份目标存储
-
持续提升 TiFlash 列式存储引擎和 MPP 计算引擎的稳定性和性能
-
为 TiDB Lightning 增加已存在数据表是否允许导入的开关
-
优化持续性能分析【实验特性】
-
TiSpark 支持用户认证与鉴权
4.1.2. 兼容性
td {white-space:pre-wrap;border:1px solid #dee0e3;}| 变量名 | 修改类型 | 描述 |
|---|---|---|
| tidb_enable_column_tracking | 新增 | 用于控制是否开启 TiDB 对 PREDICATE COLUMNS 的收集,默认值为 OFF 。 |
| tidb_enable_paging | 新增 | 此变量用于控制 IndexLookUp 算子是否使用分页 (paging) 方式发送 Coprocessor 请求,默认值为 OFF 。对于使用 IndexLookUp 和 Limit 并且 Limit 无法下推到 IndexScan 上的读请求,可能会出现读请求的延迟高、TiKV 的 Unified read pool CPU 使用率高的情况。在这种情况下,由于 Limit 算子只需要少部分数据,开启 tidb_enable_paging ,能够减少处理数据的数量,从而降低延迟、减少资源消耗。 |
| tidb_enable_top_sql | 新增 | 用于控制是否开启 Top SQL 特性,默认值为 OFF。 |
| tidb_persist_analyze_options | 新增 | 用于控制是否开启 ANALYZE 配置持久化特性,默认值为 ON 。 |
| tidb_read_staleness | 新增 | 用于设置当前会话允许读取的历史数据范围,默认值为 0 。 |
| tidb_regard_null_as_point | 新增 | 用于控制优化器是否可以将包含 null 的等值条件作为前缀条件来访问索引。 |
| tidb_stats_load_sync_wait | 新增 | 这个变量用于控制是否开启统计信息的同步加载模式(默认为 0 代表不开启,即为异步加载模式),以及开启的情况下,SQL 执行同步加载完整统计信息等待多久后会超时。 |
| tidb_stats_load_pseudo_timeout | 新增 | 用于控制统计信息同步加载超时后,SQL 是执行失败 ( OFF ) 还是退回使用 pseudo 的统计信息 ( ON ),默认值为 OFF 。 |
| tidb_backoff_lock_fast | 修改 | 默认值由 100 修改为 10 。 |
| tidb_enable_index_merge | 修改 | 默认值由 OFF 改为 ON 。如果从低于 v4.0.0 版本升级到 v5.4.0 及以上版本的集群,该变量值默认保持 OFF 。如果从 v4.0.0 及以上版本升级到 v5.4.0 及以上版本的集群,该变量开关保持升级前的状态。对于 v5.4.0 及以上版本的新建集群,该变量开关默认保持 ON 。 |
| tidb_store_limit | 修改 | v5.4.0 前支持实例级别及集群级别的设置,现在只支持集群级别的设置。 |
4.2. 升级前准备
4.2.1. 更新 TiUP 离线镜像
可参考 DISCOURSE_PLACEHOLDER_93 ,部署新版 TiUP 离线镜像。上传到中控机。在执行 local_install.sh 后,TiUP 会执行 tiup mirror set tidb-community-server-$version-linux-amd64 指定新版离线镜像源。
离线镜像包下载地址 https://pingcap.com/zh/product-community
~]$ id
uid=1000(tidb) gid=1000(tidb) groups=1000(tidb)

~]$ tar -xzvf tidb-community-server-v5.4.2-linux-amd64.tar.gz
~]$ sh tidb-community-server-v5.4.2-linux-amd64/local_install.sh
~]$ source /home/tidb/.bash_profile

~]$ tiup update cluster
Updated successfully!
此时离线镜像已经更新成功。如果覆盖后发现 TiUP 运行报错,可尝试 rm -rf ~/.tiup/manifests/* 后再使用。
4.2.2. 修改存在冲突的配置项
通过命令 tiup cluster edit-config <集群名> 载入 TiDB 集群配置,修改存在冲突的配置项。若原集群未修改过默认的配置参数,可忽略此步骤。
~]$ tiup cluster edit-config kruidb-cluster
以下 TiKV 参数在 TiDB v5.0 已废弃。如果在原集群配置过以下参数,需要通过 edit-config 编辑模式删除这些参数:
-
pessimistic-txn.enabled
-
server.request-batch-enable-cross-command
-
server.request-batch-wait-duration
4.2.3. 集群健康检查
升级前,通过 tiup cluster check <集群名> --cluster 对集群当前的 region 健康状态进行检查。
~]$ tiup cluster check kruidb-cluster --cluster

...
192.168.3.225  cpu-governor  Warn    Unable to determine current CPU frequency governor policy
192.168.3.225  memory        Pass    memory size is 4096MB
Checking region status of the cluster kruidb-cluster...
All regions are healthy.
如果结果为 " All regions are healthy ",则说明当前集群中所有 region 均为健康状态,可以继续执行升级;
如果结果为 " Regions are not fully healthy: m miss-peer, n pending-peer " 并提示 " Please fix unhealthy regions before other operations. ",则说明当前集群中有 region 处在异常状态,应先排除相应异常状态。
4.3. 升级集群
TiUP Cluster 包括不停机升级与停机升级两种方式。
默认为不停机升级,即升级过程中集群仍然可以对外提供服务。升级时会对各 TiKV 节点逐个迁移 Leader 后再升级和重启,因此对于大规模集群需要较长时间才能完成整个升级操作。
停机升级则避免了调度 Leader 的过程,若业务可停机,则可以使用停机升级的方式快速进行升级操作。
4.3.1. 停机升级
# 1. 关闭 TiDB 集群
~]$ tiup cluster stop kruidb-cluster

# 2. 升级 TiDB 集群
~]$ tiup cluster upgrade kruidb-cluster v5.4.2 --offline# 3. 启动 TiDB 集群
~]$ tiup cluster start kruidb-cluster
4.3.2. 不停机升级
# 不停机升级 TiDB 集群
~]$ tiup cluster upgrade kruidb-cluster v5.4.2

tiup is checking updates for component cluster ...
Starting component `cluster`: /home/tidb/.tiup/components/cluster/v1.10.2/tiup-cluster upgrade kruidb-cluster v5.4.2
This operation will upgrade tidb v5.3.0 cluster kruidb-cluster to v5.4.2.
Do you want to continue? [y/N]:(default=N)y

......
Upgrading component pd
        Restarting instance 192.168.3.221:2379
        Restart instance 192.168.3.221:2379 success
        Restarting instance 192.168.3.222:2379
        Restart instance 192.168.3.222:2379 success
        Restarting instance 192.168.3.223:2379
        Restart instance 192.168.3.223:2379 success
Upgrading component tikv
        Evicting 4 leaders from store 192.168.3.224:20160...
          Still waitting for 4 store leaders to transfer...
          Still waitting for 4 store leaders to transfer...
          ......
        Restarting instance 192.168.3.224:20160
Upgrading component tidb
        Restarting instance 192.168.3.221:4000
        ......

Starting component blackbox_exporter
        Start 192.168.3.221 success
        ......
Upgraded cluster `kruidb-cluster` successfully
升级 TiKV 期间,会逐个将 TiKV 上的所有 Leader 切走再停止该 TiKV 实例。默认超时时间为 5 分钟(300 秒),超时后会直接停止该实例。可通过 --transfer-timeout 将超时时间指定为一个更大的值,如 --transfer-timeout 3600 ,单位为秒。
若想将 TiFlash 从 5.3 之前的版本升级到 5.3 及之后的版本,必须进行 TiFlash 的停机升级。步骤如下:
# 1. 关闭 TiFlash 实例
~]$ tiup cluster stop kruidb-cluster -R tiflash

# 2. --offline 以不重启的方式,升级 TiDB 集群
~]$ tiup cluster upgrade kruidb-cluster v5.4.2 --offline

# 3. reload 集群,TiFlash 也会正常启动
~]$ tiup cluster reload kruidb-cluster
4.4. 升级验证
~]$ tiup cluster display kruidb-cluster

tiup is checking updates for component cluster ...
Starting component `cluster`: /home/tidb/.tiup/components/cluster/v1.10.2/tiup-cluster display kruidb-cluster
Cluster type:       tidb
Cluster name:       kruidb-cluster
Cluster version:    v5.4.2
Deploy user:        tidb
SSH type:           builtin
Dashboard URL:      http://192.168.3.222:2379/dashboard
Grafana URL:        http://192.168.3.221:3000
......
4.5. 升级FAQ
4.5.1. 升级中断后继续升级
升级报错中断,排错后重新执行 tiup cluster upgrade 命令,继续升级。
若不希望重启已升级过的节点,可按如下步骤进行。
- 确定失败的节点 ID,记为
<Audit ID>
~]$ tiup cluster audit

tiup is checking updates for component cluster ...
Starting component `cluster`: /home/tidb/.tiup/components/cluster/v1.10.2/tiup-cluster audit
ID           Time                       Command
--           ----                       -------
fWDnXxZpQ5G  2022-07-25T17:02:32+08:00  /home/tidb/.tiup/components/cluster/v1.7.0/tiup-cluster template
fWDnZLRQttJ  2022-07-25T17:03:11+08:00  /home/tidb/.tiup/components/cluster/v1.7.0/tiup-cluster template
fWDp44XHFw7  2022-07-25T17:04:27+08:00  /home/tidb/.tiup/components/cluster/v1.7.0/tiup-cluster template
fWDpyj6Qbcq  2022-07-25T17:11:33+08:00  /home/tidb/.tiup/components/cluster/v1.7.0/tiup-cluster check ./topology.yaml --user tidb
fWDpKg3hbwg  2022-07-25T17:14:11+08:00  /home/tidb/.tiup/components/cluster/v1.7.0/tiup-cluster check ./topology.yaml --apply --user root
fWDpNrc8pn1  2022-07-25T17:15:06+08:00  /home/tidb/.tiup/components/cluster/v1.7.0/tiup-cluster check ./topology.yaml --user tidb
fWDq5SPjQsW  2022-07-25T17:19:56+08:00  /home/tidb/.tiup/components/cluster/v1.7.0/tiup-cluster check ./topology.yaml --user tidb
fWDqcJwFnB3  2022-07-25T17:21:38+08:00  /home/tidb/.tiup/components/cluster/v1.7.0/tiup-cluster check ./topology.yaml --user tidb
fWDqsr5r9zF  2022-07-25T17:25:05+08:00  /home/tidb/.tiup/components/cluster/v1.7.0/tiup-cluster check ./topology.yaml --user tidb
fWDr9dxMr6F  2022-07-25T17:35:52+08:00  /home/tidb/.tiup/components/cluster/v1.7.0/tiup-cluster check ./topology.yaml --user tidb
fWDrH4pJjpm  2022-07-25T17:43:27+08:00  /home/tidb/.tiup/components/cluster/v1.7.0/tiup-cluster deploy kruidb-cluster v5.3.0 ./topology.yaml --user tidb
fWDrMwhrcL3  2022-07-25T17:44:45+08:00  /home/tidb/.tiup/components/cluster/v1.7.0/tiup-cluster display kruidb-cluster
fWDrQCMcGdM  2022-07-25T17:45:40+08:00  /home/tidb/.tiup/components/cluster/v1.7.0/tiup-cluster start kruidb-cluster
fWDrSX3Djmk  2022-07-25T17:46:20+08:00  /home/tidb/.tiup/components/cluster/v1.7.0/tiup-cluster display kruidb-cluster
fWDs1sMGK7m  2022-07-25T17:48:33+08:00  /home/tidb/.tiup/components/cluster/v1.7.0/tiup-cluster edit-config kruidb-cluster
fWDs6Tk2kdB  2022-07-25T17:50:08+08:00  /home/tidb/.tiup/components/cluster/v1.7.0/tiup-cluster list
fWDMzrPWZ21  2022-07-25T21:56:04+08:00  /home/tidb/.tiup/components/cluster/v1.7.0/tiup-cluster display kruidb-cluster
fWGm3DMvvkR  2022-07-26T18:00:00+08:00  /home/tidb/.tiup/components/cluster/v1.10.2/tiup-cluster edit-config kruidb-cluster
fWGm48bVhDw  2022-07-26T18:00:09+08:00  /home/tidb/.tiup/components/cluster/v1.10.2/tiup-cluster check kruidb-cluster --cluster
fWGp8JYqVFL  2022-07-26T18:31:24+08:00  /home/tidb/.tiup/components/cluster/v1.10.2/tiup-cluster upgrade kruidb-cluster v5.4.2
fWGpwx1834M  2022-07-26T18:36:38+08:00  /home/tidb/.tiup/components/cluster/v1.10.2/tiup-cluster display kruidb-cluster
- 重试失败的节点
~]$ tiup cluster replay <Audit ID>
4.5.2. evict leader 等待时间过长
~]$ tiup cluster upgrade kruidb-cluster v5.4.2 --force
--force 参数可以不驱逐 Leader,直接快速升级集群至新版本,但是该方式会忽略所有升级中的错误,在升级失败后得不到有效提示,需谨慎使用。
4.5.3. 更新 pd-ctl 等周边工具版本
通过 TiUP 安装对应版本的 ctl 组件来更新相关工具版本。
~]$ tiup install ctl:v5.4.2
~]$ tiup list --installed --verbose

Available components:
Name     Owner    Installed       Platforms    Description
----     -----    ---------       ---------    -----------
bench    pingcap  v1.7.0          linux/amd64  Benchmark database with different workloads
cluster  pingcap  v1.10.2,v1.7.0  linux/amd64  Deploy a TiDB cluster for production
ctl      pingcap  v5.4.2          linux/amd64  TiDB controller suite
关于 TiUP 组件的使用,可参考官网 https://docs.pingcap.com/zh/tidb/v5.4/tiup-component-management
5. 扩缩容TiDB/PD/TiKV
5.1. 扩容 TiDB/PD/TiKV
5.1.1. 节点配置
- 按
1.3 主机配置章节,为待扩容节点创建 tidb 用户、免密登录、系统优化等。
5.1.2. 节点配置文件
编辑扩容配置文件 tidb-scale-out.yaml,添加扩容的 TiDB 配置参数。可通过 tiup cluster edit-config <集群名> 载入已有的配置信息,对照填写。
- TiDB Server 配置文件
~]$ cat tidb-scale-out.yaml
tidb_servers:
  - host: 192.168.3.227
- PD 配置文件
~]$ cat pd-scale-out.yaml
pd_servers:
  - host: 192.168.3.228
- TiKV 配置文件
~]$ cat tikv-scale-out.yaml
tikv_servers:
  - host: 192.168.3.229
这里为节省时间,同时扩容三类(TiDB、PD、TiKV)节点,准备扩容配置文件 scale-out.yaml 内容如下:
pd_servers:
  - host: 192.168.3.228
tidb_servers:
  - host: 192.168.3.227
tikv_servers:
  - host: 192.168.3.229
生产环境扩容,建议针对没类节点分别扩容。
5.1.3. 扩容检查
- 扩容检查
以扩容 TiDB(192.168.3.227)为例。
~]$ tiup cluster check kruidb-cluster scale-out.yaml --cluster

Node           Check         Result  Message
----           -----         ------  -------
192.168.3.228  selinux       Pass    SELinux is disabled
192.168.3.228  thp           Pass    THP is disabled
192.168.3.228  command       Pass    numactl: policy: default
192.168.3.228  os-version    Pass    OS is CentOS Linux 7 (Core) 7.9.2009
192.168.3.228  cpu-cores     Pass    number of CPU cores / threads: 4
192.168.3.228  cpu-governor  Warn    Unable to determine current CPU frequency governor policy
192.168.3.228  memory        Pass    memory size is 4096MB
192.168.3.229  cpu-governor  Warn    Unable to determine current CPU frequency governor policy
192.168.3.229  memory        Pass    memory size is 4096MB
192.168.3.229  selinux       Pass    SELinux is disabled
192.168.3.229  thp           Pass    THP is disabled
192.168.3.229  command       Pass    numactl: policy: default
192.168.3.229  timezone      Pass    time zone is the same as the first PD machine: America/New_York
192.168.3.229  os-version    Pass    OS is CentOS Linux 7 (Core) 7.9.2009
192.168.3.229  cpu-cores     Pass    number of CPU cores / threads: 4
192.168.3.227  memory        Pass    memory size is 4096MB
192.168.3.227  selinux       Pass    SELinux is disabled
192.168.3.227  thp           Pass    THP is disabled
192.168.3.227  command       Pass    numactl: policy: default
192.168.3.227  timezone      Pass    time zone is the same as the first PD machine: America/New_York
192.168.3.227  os-version    Pass    OS is CentOS Linux 7 (Core) 7.9.2009
192.168.3.227  cpu-cores     Pass    number of CPU cores / threads: 4
192.168.3.227  cpu-governor  Warn    Unable to determine current CPU frequency governor policy
- 风险修复
应用如下命令,可修复大部分的风险。针对无法自动修复的风险,可手动修复。如下示例,需手动安装 numactl 包。
DISCOURSE_PLACEHOLDER_127
5.1.4. 执行扩容
- 执行扩容 TiDB
DISCOURSE_PLACEHOLDER_128
- 检查集群状态
DISCOURSE_PLACEHOLDER_129
- 为 Haproxy 增加扩容的 TiDB 节点
~]# echo "server tidb-4 192.168.3.228:4000 check inter 2000 rise 2 fall 3" >> /etc/haproxy/haproxy.cfg
~]# systemctl stop haproxy
~]# systemctl start haproxy
5.2. 缩容TiDB/PD/TiKV
DISCOURSE_PLACEHOLDER_131 命令用于 TiDB 集群的缩容操作。TiDB 针对不同节点的缩容,进行不同的处理:
- 对 TiKV,TiFlash 及 TiDB Binlog 组件的操作:
-
DISCOURSE_PLACEHOLDER_132通过 API 将 TiKV,TiFlash 及 TiDB Binlog 下线后,直接退出而不等待下线完成。TiKV,TiFlash 及 TiDB Binlog 组件异步下线完成后,状态变为Tombstone -
DISCOURSE_PLACEHOLDER_134查看下线节点的状态,等待其状态变为 Tombstone。 -
tiup cluster prune命令清理 Tombstone 节点。该命令会停止已下线的节点的服务;清理已经下线掉的节点的相关数据文件;更新集群的拓扑,移除已经下线掉的节点。
- 对其他组件的操作
-
下线 PD 组件时,会通过 API 将指定节点从集群中删除掉(这个过程很快),然后停掉指定 PD 的服务并且清除该节点的相关数据文件;
-
下线其他组件时,直接停止并且清除节点的相关数据文件
5.2.1. 缩容 TiDB/PD
若集群应用了 Haproxy,需先修改 Haproxy 配置,路径为 DISCOURSE_PLACEHOLDER_136 ,删除待缩容的 TiDB 节点,并重启 Haproxy 服务。
- 查看节点 ID 信息
DISCOURSE_PLACEHOLDER_137
- 执行缩容
以同时缩容 ID 为 DISCOURSE_PLACEHOLDER_138 的 TiDB 节点和 ID 为 192.168.3.228:2379 的 PD 节点为例。生产环境建议每个节点单独缩容。
~]$ tiup cluster scale-in kruidb-cluster --node 192.168.3.227:4000 --node 192.168.3.228:2379 --node 192.168.3.229:20160
tiup is checking updates for component cluster ...
Starting component `cluster`: /home/tidb/.tiup/components/cluster/v1.10.2/tiup-cluster scale-in kruidb-cluster --node 192.168.3.227:4000 --node 192.168.3.228:2379 --node 192.168.3.229:20160
This operation will delete the 192.168.3.227:4000,192.168.3.228:2379,192.168.3.229:20160 nodes in `kruidb-cluster` and all their data.
Do you want to continue? [y/N]:(default=N) y
The component `[tikv]` will become tombstone, maybe exists in several minutes or hours, after that you can use the prune command to clean it
Do you want to continue? [y/N]:(default=N) y
Scale-in nodes...

...
+ Reload prometheus and grafana
  - Reload prometheus -> 192.168.3.221:9090 ... Done
  - Reload grafana -> 192.168.3.221:3000 ... Done
Scaled cluster `kruidb-cluster` in successfully
- 检查集群状态
DISCOURSE_PLACEHOLDER_141
- 清理 Tombstone 节点
待 TiKV 节点由 DISCOURSE_PLACEHOLDER_142 状态,转变为 Tombstone 状态后,即可执行 tiup cluster prune <集群名> 清理已下线的 TiKV节点,更新集群拓扑。
DISCOURSE_PLACEHOLDER_145
- 检查集群状态
DISCOURSE_PLACEHOLDER_146
6. 扩缩容 TiFlash
6.1. 扩容 TiFlash
6.1.1. 扩容 TiFlash 步骤
在原有集群上新增 TiFlash 组件,需要确保 TiDB 集群版本为 v5.0 以上,并且需要开启 PD 的 Placement Rules(5.0及以上默认开启) 功能。
- 确认开启 PD 的 Placement Rules
进入 pd-ctl 交互模式查看 placement-rules 启用状态。
~]$ tiup ctl:v5.4.2 pd -u http://192.168.3.222:2379 -i
Starting component `ctl`: /home/tidb/.tiup/components/ctl/v5.4.2/ctl pd -u http://192.168.3.222:2379 -i
» config show replication
{
  "max-replicas": 3,
  "location-labels": "",
  "strictly-match-label": "false",
  "enable-placement-rules": "true",
  "enable-placement-rules-cache": "false",
  "isolation-level": ""
}
若未开启,可在 pd-ctl 交互模式中执行 config set enable-placement-rules true 开启 Placement Rules。也可通过 tiup 组件调用 pd-ctl 开启 Placement Rules。
~]$ tiup ctl:v5.4.2 pd -u http://192.168.3.222:2379 -i
>> config set enable-placement-rules true
DISCOURSE_PLACEHOLDER_150
- 编辑 TiFlash 节点配置文件 tiflash-out.yaml
~]$ cat tiflash-out.yaml
tiflash_servers:
  - host: 192.168.3.228
  - host: 192.168.3.229
- 扩容检查及修复
~]$ tiup cluster check kruidb-cluster tiflash-out.yaml --cluster

~]$ tiup cluster check kruidb-cluster tiflash-out.yaml --cluster --apply --user root -p
- 执行扩容
DISCOURSE_PLACEHOLDER_153
- 检查集群
DISCOURSE_PLACEHOLDER_154
6.1.2. 列存验证
- 创建测试表
~]$ mysql -uroot -h 192.168.3.221 -P 4000 -proot

mysql> use test;
Database changed

mysql> create table t_test(id int, name varchar(32));
Query OK, 0 rows affected (0.55 sec)

mysql> insert into t_test values(1,'zhang3');
Query OK, 1 row affected (0.03 sec)
- 为测试表添加 TiFlash 列存副本
mysql> alter table test.t_test set tiflash replica 2;
Query OK, 0 rows affected (0.51 sec)
也可按库创建 TiFlash 列存副本,语法为 alter table <数据库名> set tiflash replica <副本数>;
- 查看列存副本同步进度
DISCOURSE_PLACEHOLDER_158
AVAILABLE 字段表示该表的 TiFlash 副本是否可用。1 代表可用,0 代表不可用。副本状态为可用之后就不再改变,如果通过 DDL 命令修改副本数则会重新计算同步进度。
PROGRESS 字段代表同步进度,在 0.0~1.0 之间,1 代表至少 1 个副本已经完成同步。
6.2. 缩容 TiFlash
6.2.1. 调整列存副本数
在缩容 TiFlash 节点之前,需确保 TiFlash 集群剩余节点数大于等于所有数据表的最大副本数,否则需要修改相关表的副本数。
~]$ mysql -uroot -h 192.168.3.221 -P 4000 -proot

mysql> SELECT * FROM information_schema.tiflash_replica WHERE TABLE_SCHEMA = 'test' and TABLE_NAME = 't_test';
+--------------+------------+----------+---------------+-----------------+-----------+----------+
| TABLE_SCHEMA | TABLE_NAME | TABLE_ID | REPLICA_COUNT | LOCATION_LABELS | AVAILABLE | PROGRESS |
+--------------+------------+----------+---------------+-----------------+-----------+----------+
| test         | t_test     |      111 |             2 |                 |         1 |        1 |
+--------------+------------+----------+---------------+-----------------+-----------+----------+
1 row in set (0.00 sec)

mysql> alter table test.t_test set tiflash replica 1;
6.2.2. 缩容 TiFlash 节点
6.2.2.1. 通过 TiUP 缩容 TiFlash 节点
- 查看 TiFlash 节点 ID
~]$ tiup cluster display kruidb-cluster

tiup is checking updates for component cluster ...
Starting component `cluster`: /home/tidb/.tiup/components/cluster/v1.10.2/tiup-cluster display kruidb-cluster
Cluster type:       tidb
Cluster name:       kruidb-cluster
Cluster version:    v5.4.2
Deploy user:        tidb
SSH type:           builtin
Dashboard URL:      http://192.168.3.222:2379/dashboard
Grafana URL:        http://192.168.3.221:3000
ID                   Role          Host           Ports                            OS/Arch       Status  Data Dir                      Deploy Dir
--                   ----          ----           -----                            -------       ------  --------                      ----------
192.168.3.221:9093   alertmanager  192.168.3.221  9093/9094                        linux/x86_64  Up      /tidb-data/alertmanager-9093  /tidb-deploy/alertmanager-9093
192.168.3.221:3000   grafana       192.168.3.221  3000                             linux/x86_64  Up      -                             /tidb-deploy/grafana-3000
192.168.3.221:2379   pd            192.168.3.221  2379/2380                        linux/x86_64  Up      /tidb-data/pd-2379            /tidb-deploy/pd-2379
192.168.3.222:2379   pd            192.168.3.222  2379/2380                        linux/x86_64  Up|UI   /tidb-data/pd-2379            /tidb-deploy/pd-2379
192.168.3.223:2379   pd            192.168.3.223  2379/2380                        linux/x86_64  Up|L    /tidb-data/pd-2379            /tidb-deploy/pd-2379
192.168.3.221:9090   prometheus    192.168.3.221  9090/12020                       linux/x86_64  Up      /tidb-data/prometheus-9090    /tidb-deploy/prometheus-9090
192.168.3.221:4000   tidb          192.168.3.221  4000/10080                       linux/x86_64  Up      -                             /tidb-deploy/tidb-4000
192.168.3.222:4000   tidb          192.168.3.222  4000/10080                       linux/x86_64  Up      -                             /tidb-deploy/tidb-4000
192.168.3.223:4000   tidb          192.168.3.223  4000/10080                       linux/x86_64  Up      -                             /tidb-deploy/tidb-4000
192.168.3.228:9000   tiflash       192.168.3.228  9000/8123/3930/20170/20292/8234  linux/x86_64  Up      /tidb-data/tiflash-9000       /tidb-deploy/tiflash-9000
192.168.3.229:9000   tiflash       192.168.3.229  9000/8123/3930/20170/20292/8234  linux/x86_64  Up      /tidb-data/tiflash-9000       /tidb-deploy/tiflash-9000
192.168.3.224:20160  tikv          192.168.3.224  20160/20180                      linux/x86_64  Up      /tidb-data/tikv-20160         /tidb-deploy/tikv-20160
192.168.3.225:20160  tikv          192.168.3.225  20160/20180                      linux/x86_64  Up      /tidb-data/tikv-20160         /tidb-deploy/tikv-20160
192.168.3.226:20160  tikv          192.168.3.226  20160/20180                      linux/x86_64  Up      /tidb-data/tikv-20160         /tidb-deploy/tikv-20160
Total nodes: 14
- 执行缩容
~]$ tiup cluster scale-in kruidb-cluster --node 192.168.3.228:9000
tiup is checking updates for component cluster ...
Starting component `cluster`: /home/tidb/.tiup/components/cluster/v1.10.2/tiup-cluster scale-in kruidb-cluster --node 192.168.3.228:9000
This operation will delete the 192.168.3.228:9000 nodes in `kruidb-cluster` and all their data.
Do you want to continue? [y/N]:(default=N) y
The component `[tiflash]` will become tombstone, maybe exists in several minutes or hours, after that you can use the prune command to clean it
Do you want to continue? [y/N]:(default=N) y
Scale-in nodes...
- 清理集群
待缩容后的 TiFlash 节点状态变为 Tombstone 时,执行如下语句清理集群,更新拓扑。
~]$ tiup cluster prune kruidb-cluster
6.2.2.2. 手动强制缩容 TiFlash 节点
在特殊情况下(比如需要强制下线节点),或者 TiUP 操作失败的情况下,可以使用以下方法手动下线 TiFlash 节点。
- 调整列存副本数
~]$ mysql -uroot -h 192.168.3.221 -P 4000 -proot

mysql> alter table test.t_test set tiflash replica 0;
Query OK, 0 rows affected (0.52 sec)

mysql> SELECT * FROM information_schema.tiflash_replica WHERE TABLE_SCHEMA = 'test' and TABLE_NAME = 't_test';
Empty set (0.00 sec)
- pd-ctl 查看 TiFlash 节点的 Store ID
DISCOURSE_PLACEHOLDER_165
也可用如下命令获取 store ID
DISCOURSE_PLACEHOLDER_166
- pd-ctl 下线 TiFlash 节点
DISCOURSE_PLACEHOLDER_167
- 等待该 TiFlash 节点对应的 store 消失或 state_name 变为 Tombstone,再关闭 TiFlash 进程。
DISCOURSE_PLACEHOLDER_320
-
删除 TiFlash 节点的数据文件
-
手动更新集群配置文件,删除已下线的 TiFlash 节点信息
官方文档 手动缩容 TiFlash 节点中介绍通过 DISCOURSE_PLACEHOLDER_321 手动删除 TiFlash 相关信息。但是,经过实践发现删除 TIFlash 信息后,无法 wq 保存退出。最终通过如下方式清理掉 TiFlash 相关信息。
DISCOURSE_PLACEHOLDER_322
手动缩容 TiFlash 是为了应对 TiUP 缩容失败时的备选方案,如果仍然需要通过 tiup cluster scale-in 清理掉 TiFlash 信息,这也失去了手动缩容的意义。
6.2.3. 清除同步规则
在TiFlash停止运行之前,若未取消所有同步到TiFlash的表,则需要手动在PD中清除同步规则,否则无法成功完成TiFlash节点的下线。清除步骤如下:
- 查询当前PD实例中所有与TiFlash相关的数据同步规则
DISCOURSE_PLACEHOLDER_324
返回为空,说明已取消所有表的TiFlash同步规则。若有未取消的同步规则,则返回的内容形式如下,表示id为table-45-r的表,未取消同步规则:
DISCOURSE_PLACEHOLDER_325
- 删除id为table-45-r的表的同步规则
~]$ curl -v -X DELETE http://192.168.3.221:2379/pd/api/v1/config/rule/tiflash/table-45-r
7. 部署 TiSpark
TiDB 推荐以 Spark Standalone(即 Master/Slave 模式) 模式部署 Spark集群,并通过 TiUP 组件以扩容 TiSpark 节点的方式部署 TiSpark。
- 部署规划
| IP | 作用 | 默认端口 |
|---|---|---|
| 192.168.3.227 | Spark Master、TiSpark | Master 通信端口:7077 |
| Master WebUI 端口:8080 | ||
| 192.168.3.228 | Spark Worker、TiSpark | Worker 通信端口:7078 |
| Worker WebUI 端口:8080 | ||
| 192.168.3.229 | Spark Worker、TiSpark | Worker 通信端口:7078 |
| Worker WebUI 端口:8080 |
- 版本对应
| TiSpark 版本 | TiDB、TiKV、PD 版本 | Spark 版本 | Scala 版本 |
|---|---|---|---|
| 2.4.x-scala_2.11 | 5.x,4.x | 2.3.x,2.4.x | 2.11 |
| 2.4.x-scala_2.12 | 5.x,4.x | 2.4.x | 2.12 |
| 2.5.x | 5.x,4.x | 3.0.x,3.1.x | 2.12 |
| 3.0.x | 5.x,4.x | 3.0.x,3.1.x,3.2.x | 2.12 |
TiSpark 命名规则 tispark-assembly-{$spark_version}_{$scala_version}-{$tispark_verison} ,下载链接 https://github.com/pingcap/tispark/releases,这里采用 DISCOURSE_PLACEHOLDER_176
Spark 下载链接 https://spark.apache.org/downloads.html,可在清华镜像加速下载,地址为:https://mirrors.tuna.tsinghua.edu.cn/apache/spark/ 这里采用 DISCOURSE_PLACEHOLDER_177
7.1. Spark Standalone 集群
7.1.1. 部署准备
- 安装 jdk 参考
DISCOURSE_PLACEHOLDER_178节,配置本地 YUM 源 。为192.168.3.227/228/229安装 jdk。
~]# yum -y install java-1.8.0-openjdk java-1.8.0-openjdk-devel
- 用户设置
参照 1.3.9 章节为 192.168.3.227/228/229 创建 tidb 用户,并设置 sudo 权限和资源限制。
- 环境变量
DISCOURSE_PLACEHOLDER_334
~]$ source .bash_profile
~]$ java -version
openjdk version "1.8.0_332"
OpenJDK Runtime Environment (build 1.8.0_332-b09)
OpenJDK 64-Bit Server VM (build 25.332-b09, mixed mode)
- 免密登录
192.168.3.227/228/229每台机器执行,使互相之间和免密登录。
~]$ ssh-keygen -t rsa
~]$ ssh-copy-id tidb@192.168.3.227
~]$ ssh-copy-id tidb@192.168.3.228
~]$ ssh-copy-id tidb@192.168.3.229
7.1.2. Spark Master
7.1.2.1. Master 部署
部署 192.169.3.227 为 Spark 集群的 Master 节点,通信端口为 7077。参照 TiDB 集群部署规则,将 Spark Master 部署至 /tidb-deploy/spark 目录中。
~]$ id
uid=1000(tidb) gid=1000(tidb) groups=1000(tidb)

~]$ sudo mkdir -p /tidb-deploy
~]$ sudo chown -R tidb:tidb /tidb-deploy
~]$ sudo chown -R tidb:tidb spark-3.1.3-bin-hadoop2.7.tgz
~]$ tar -xzvf spark-3.1.3-bin-hadoop2.7.tgz
~]$ mv spark-3.1.3-bin-hadoop2.7 /tidb-deploy/

~]$ tree -Lh 1   /tidb-deploy/spark-3.1.3-bin-hadoop2.7
/tidb-deploy/spark
├── [4.0K]  bin
├── [4.0K]  conf
├── [4.0K]  data
├── [4.0K]  examples
├── [ 20K]  jars
├── [4.0K]  kubernetes
├── [ 23K]  LICENSE
├── [4.0K]  licenses
├── [ 56K]  NOTICE
├── [4.0K]  python
├── [4.0K]  R
├── [4.4K]  README.md
├── [ 183]  RELEASE
├── [4.0K]  sbin
└── [4.0K]  yarn

11 directories, 4 files

~]$ cat >> ~/.bash_profile << EOF
export SPARK_HOME=/tidb-deploy/spark-3.1.3-bin-hadoop2.7
export PATH=$SPARK_HOME/bin:$SPARK_HOME/sbin:$PATH
EOF

~]$ source .bash_profile
7.1.2.2. Master 配置
conf/spark-env.sh
~]$ cd /tidb-deploy/spark-3.1.3-bin-hadoop2.7/conf
~]$ mv spark-env.sh.template spark-env.sh

~]$ cat > /tidb-deploy/spark-3.1.3-bin-hadoop2.7/conf/spark-env.sh <<EOF
export SPARK_MASTER_HOST=192.168.3.227  # 设置运行 master 进程的节点
export SPARK_MASTER_PORT=7077           # 设置 master 的通信端口
export SPARK_WORKER_CORES=1             # 每个 worker 使用的核数
export SPARK_WORKER_MEMORY=1024M        # 每个 worker 使用的内存大小
export SPARK_MASTER_WEBUI_PORT=8080     # master 的 webui 端口
export SPARK_CONF_DIR=/tidb-deploy/spark-3.1.3-bin-hadoop2.7/conf # spark 的配置文件目录
export JAVA_HOME=/usr/lib/jvm/java-1.8.0-openjdk-1.8.0.332.b09-1.el7_9.x86_64 # jdk 安装路径
export SPARK_WORKER_PORT=7078           # 每个 worker 的通信端口
export SPARK_WORKER_WEBUI_PORT=8081     # worker 的 webui 端口
export SPARK_WORKER_DIR=/tidb-deploy/spark-3.1.3-bin-hadoop2.7/work  # workers 的工作目录,需要手动创建
EOF
conf/workers
DISCOURSE_PLACEHOLDER_343
- 将配置完毕的 SPARK_HOME 目录打包
~]$ cd /tidb-deploy

~]$ tar -czvf spark-worker.tgz spark-3.1.3-bin-hadoop2.7
7.1.2.3. Workers 部署
分发至 Spark Worker 节点。解压至 /tidb-deploy/spark-3.1.3-bin-hadoop2.7 ,并创建目录 /tidb-deploy/spark-3.1.3-bin-hadoop2.7/work
~]$ cat >> ~/.bash_profile << EOF
export SPARK_HOME=/tidb-deploy/spark-3.1.3-bin-hadoop2.7
export PATH=$SPARK_HOME/bin:$SPARK_HOME/sbin:$PATH
EOF
DISCOURSE_PLACEHOLDER_348
7.1.3. 启动 Spark 集群
- Master 节点执行 start-all.sh
~]$ ip a |grep 192
    inet 192.168.3.227/24 brd 192.168.3.255 scope global noprefixroute eth0

~]$ id
uid=1000(tidb) gid=1000(tidb) groups=1000(tidb) context=unconfined_u:unconfined_r:unconfined_t:s0-s0:c0.c1023

~]$ start-all.sh
starting org.apache.spark.deploy.master.Master, logging to /tidb-deploy/spark-3.1.3-bin-hadoop2.7/logs/spark-tidb-org.apache.spark.deploy.master.Master-1-localhost.localdomain.out
192.168.3.228: starting org.apache.spark.deploy.worker.Worker, logging to /tidb-deploy/spark-3.1.3-bin-hadoop2.7/logs/spark-tidb-org.apache.spark.deploy.worker.Worker-1-localhost.localdomain.out
192.168.3.229: starting org.apache.spark.deploy.worker.Worker, logging to /tidb-deploy/spark-3.1.3-bin-hadoop2.7/logs/spark-tidb-org.apache.spark.deploy.worker.Worker-1-localhost.localdomain.out
【注意】
-
若 Master/Worker 节点的 Spark 程序部署路径一致(即主从的SPARK_HOME路径一致),则可通过 Master 节点的
start-all.sh与stop-all.sh脚本统一启停主从节点; -
若 Master/Worker 节点的 Spark 程序部署路径不一致(即主从的SPARK_HOME路径不一致),如Master部署路径为
/tidb-deploy/spark-7077、Worker节点部署路径为/tidb-deploy/spark-7078。 则需要先在Master节点(192.168.3.227)执行start-master.sh启动主节点。再分别登陆从节点(192.168.3.228/229)执行DISCOURSE_PLACEHOLDER_203启动从节点。 -
浏览器打开 Master 和 WORKER 节点 WEBUI 查看集群状态
Master WEBUI:http://192.168.3.227:8080/
Worker WEBUI:http://192.168.3.228:8081/
Master WEBUI
7.2. 部署 TiSpark
7.2.1. tispark jar 包
根据 TiSpark 官方指南 https://docs.pingcap.com/zh/tidb/v5.4/tispark-overview#环境准备,适用 Spark 3.1.3 的 TiSpark 版本为 2.5.x 及 3.0.x。但是,我在部署 3.0.1 版本的 tispark,在通过 spark-sql 中执行查询时,报如下警告:
spark-sql> show database;
ANTLR Tool version 4.8 used for code generation does not match the current runtime version 4.7.1ANTLR Runtime version 4.8 used for parser compilation does not match the current runtime version 4.7.122/07/27 22:53:34 WARN HttpClientUtil: Failed to send HTTP get request.
于是,选择了 2.5.1 版本的 tispark,链接为 https://github.com/pingcap/tispark/releases/download/v2.5.1/tispark-assembly-3.1-2.5.1.jar
将 tispark-assembly-3.1-2.5.1.jar 复制到 DISCOURSE_PLACEHOLDER_357 目录下即可。
7.2.2. 配置 Spark 集群
编辑 $SPARK_HOME/conf/spark-defaults.conf 文件,针对 tispark 2.5.x 版本,增加如下内容:
spark.sql.extensions org.apache.spark.sql.TiExtensions
# PD 的 IP 及端口,多个 PD 用逗号分隔。
spark.tispark.pd.addresses 192.168.3.221:2379,192.168.3.222:2379,192.168.3.223:2379# enable write through SparkSQL
spark.tispark.write.allow_spark_sql true

spark.master spark://192.168.3.227:7077# For TiSpark version >= 2.5.0, please add the following additional configuration to enable Catalog provided by spark-3.0.
spark.sql.catalog.tidb_catalog org.apache.spark.sql.catalyst.catalog.TiCatalog
spark.sql.catalog.tidb_catalog.pd.addresses 192.168.3.221:2379,192.168.3.222:2379,192.168.3.223:2379
7.2.3. 连接验证
可访问 http://192.168.3.227:4040/environment/ ,查看 Classpath Entries 节点,检查 tispark jar 包。
DISCOURSE_PLACEHOLDER_209
如果 TiSpark 用的版本为 3.0.x,则在
8. 升级至最新版6.1
升级文档可参考官网链接: https://docs.pingcap.com/zh/tidb/stable/upgrade-tidb-using-tiup
8.1. 版本特性
8.1.1. 6.1 关键特性
发版日期:2022 年 6 月 13 日,关键特性如下:
-
List 和 List COLUMNS 分区方式 GA,与 MySQL 5.7 兼容
-
TiFlash 分区表动态裁剪 GA
-
支持兼容 MySQL 的用户级别锁管理
-
支持非事务性 DML 语法(目前仅支持 DELETE)
-
TiFlash 支持按需触发物理数据整理(Compaction)【实验特性】
-
MPP 实现窗口函数框架
-
TiCDC 支持将 changelogs 以 Avro 协议输出到 Kafka
-
DM 合库合表迁移场景的乐观 DDL 协调模式 GA
-
支持自定义 Region 大小【实验特性】
-
默认使用引擎 Raft Engine 作为 TiKV 的日志存储引擎。新引擎与 RocksDB 相比,可以减少至多 40% 的 TiKV I/O 写流量和 10% 的 CPU 使用,同时在特定负载下提升 5% 左右前台吞吐,减少 20% 长尾延迟。
8.1.2. 兼容性
- 注意事项
-
不支持将 TiFlash 组件从 5.3 之前的老版本在线升级至 5.3 及之后的版本,只能采用停机升级。
-
在升级 TiDB 集群的过程中,请勿执行 DDL 语句。
-
可通过
DISCOURSE_PLACEHOLDER_210查看当前正在执行的 DDL 作业。DISCOURSE_PLACEHOLDER_211语句用于查看当前 DDL 作业队列中的所有结果(包括正在运行以及等待运行的任务)以及已执行完成的 DDL 作业队列中的最近十条结果。 -
如需升级,请等待 DDL 执行完成或使用
DISCOURSE_PLACEHOLDER_212命令取消该 DDL Job 后再进行升级。
- 系统变量
| 变量名 | 修改类型 | 描述 |
|---|---|---|
| tidb_enable_list_partition | 修改 | 默认值从 OFF 改为 ON 。 |
| tidb_mem_quota_query | 修改 | 增加 GLOBAL 作用域,变量值可以持久化到集群。 |
| tidb_query_log_max_len | 修改 | 变量作用域由 INSTANCE 修改为 GLOBAL,变量值可以持久化到集群。取值范围修改为 [0, 1073741824] 。 |
| require_secure_transport | 新增 | 由 TiDB 配置项 require-secure-transport 转化而来。 |
| tidb_committer_concurrency | 新增 | 由 TiDB 配置项 committer-concurrency 转化而来。 |
| tidb_enable_auto_analyze | 新增 | 由 TiDB 配置项 run-auto-analyze 转化而来。 |
| tidb_enable_new_only_full_group_by_check | 新增 | 控制 TiDB 执行 ONLY_FULL_GROUP_BY 检查时的行为。 |
| tidb_enable_outer_join_reorder | 新增 | 控制 TiDB 的 Join Reorder 算法 支持 Outer Join,默认开启。对于从旧版本升级上来的集群,该变量的默认值也会是 TRUE 。 |
| tidb_enable_prepared_plan_cache | 新增 | 由 TiDB 配置项 prepared-plan-cache.enabled 转化而来。 |
| tidb_gc_max_wait_time | 新增 | 用于指定活跃事务阻碍 GC safe point 推进的最大时间。 |
| tidb_max_auto_analyze_time | 新增 | 用于指定自动 ANALYZE 的最大执行时间。 |
| tidb_max_tiflash_threads | 新增 | 由 TiFlash 配置项 max_threads 转化而来,表示 TiFlash 中 request 执行的最大并发度。 |
| tidb_mem_oom_action | 新增 | 由 TiDB 配置项 oom-action 转化而来。 |
| tidb_mem_quota_analyze | 新增 | 控制 TiDB 更新统计信息时总的内存占用,包括用户执行的 ANALYZE TABLE 和 TiDB 后台自动执行的统计信息更新任务。 |
| tidb_nontransactional_ignore_error | 新增 | 设置是否在非事务语句中立刻返回错误。 |
| tidb_prepared_plan_cache_memory_guard_ratio | 新增 | 由 TiDB 配置项 prepared-plan-cache.memory-guard-ratio 转化而来。 |
| tidb_prepared_plan_cache_size | 新增 | 由 TiDB 配置项 prepared-plan-cache.capacity 转化而来。 |
| tidb_stats_cache_mem_quota | 新增 | 控制 TiDB 内部统计信息缓存使用内存的上限。 |
- 配置文件参数
| 配置文件 | 配置项 | 修改类型 | 描述 |
|---|---|---|---|
| TiDB | committer-concurrency | 删除 | 转化为系统变量 tidb_committer_concurrency 。该配置项不再生效,如需修改,需修改对应的系统变量。 |
| TiDB | lower-case-table-names | 删除 | TiDB 目前只支持 lower_case_table_name=2 ,如果升级前设置了其他值,升级到 v6.1.0 后该值会丢失。 |
| TiDB | mem-quota-query | 删除 | 转化为系统变量 tidb_mem_quota_query 。该配置项不再生效,如需修改,需修改对应的系统变量。 |
| TiDB | oom-action | 删除 | 转化为系统变量 tidb_mem_oom_action 。该配置项不再生效,如需修改,需修改对应的系统变量。 |
| TiDB | prepared-plan-cache.capacity | 删除 | 转化为系统变量 tidb_prepared_plan_cache_size 。该配置项不再生效,如需修改,需修改对应的系统变量。 |
| TiDB | prepared-plan-cache.enabled | 删除 | 转化为系统变量 tidb_enable_prepared_plan_cache 。该配置项不再生效,如需修改,需修改对应的系统变量。 |
| TiDB | query-log-max-len | 删除 | 转化为系统变量 tidb_query_log_max_len 。该配置项不再生效,如需修改,需修改对应的系统变量。 |
| TiDB | require-secure-transport | 删除 | 转化为系统变量 require_secure_transport 。该配置项不再生效,如需修改,需修改对应的系统变量。 |
| TiDB | run-auto-analyze | 删除 | 转化为系统变量 tidb_enable_auto_analyze 。该配置项不再生效,如需修改,需修改对应的系统变量。 |
| TiDB | enable-global-kill | 新增 | 当该配置项值默认为 true , KILL 语句和 KILL TIDB 语句均能跨节点终止查询或连接,无需担心错误地终止其他查询或连接。 |
| TiDB | enable-stats-cache-mem-quota | 新增 | 控制 TiDB 是否开启统计信息缓存的内存上限。 |
| TiKV | raft-engine.enable | 修改 | 默认值从 false 修改为 true 。 |
| TiKV | region-max-keys | 修改 | 默认值从 1440000 修改为 region-split-keys / 2 * 3 。 |
| TiKV | region-max-size | 修改 | 默认值从 144 MB 修改为 region-split-size / 2 * 3 。 |
| TiKV | coprocessor.enable-region-bucket | 新增 | 是否将 Region 划分为更小的区间 bucket。 |
| TiKV | coprocessor.region-bucket-size | 新增 | 设置 enable-region-bucket 启用时 bucket 的预期大小。 |
| TiKV | causal-ts.renew-batch-min-size | 新增 | 时间戳缓存的最小数量。 |
| TiKV | causal-ts.renew-interval | 新增 | 刷新本地缓存时间戳的周期。 |
| TiKV | max-snapshot-file-raw-size | 新增 | 当 snapshot 文件大于该配置项指定的大小时,snapshot 文件会被切割为多个文件。 |
| TiKV | raft-engine.memory-limit | 新增 | 指定 Raft Engine 使用内存的上限。 |
| TiKV | storage.background-error-recovery-window | 新增 | RocksDB 检测到可恢复的后台错误后,所允许的最长恢复时间。 |
| TiKV | storage.api-version | 新增 | TiKV 作为 Raw Key Value 存储数据时使用的存储格式与接口版本。 |
| PD | schedule.max-store-preparing-time | 新增 | 控制 store 上线阶段的最长等待时间。 |
| TiCDC | enable-tls | 新增 | 控制是否使用 TLS 连接 Kafka。 |
| TiCDC | sasl-gssapi-user |
DISCOURSE_PLACEHOLDER_213 sasl-gssapi-auth-type DISCOURSE_PLACEHOLDER_215 sasl-gssapi-realm sasl-gssapi-key-tab-path DISCOURSE_PLACEHOLDER_218 |新增|支持 Kafka SASL/GSSAPI 认证所需要的参数。详情见 Sink URI 配置 kafka 。| |TiCDC| avro-decimal-handling-mode avro-bigint-unsigned-handling-mode |新增|控制 Avro 格式的输出细节。| |TiCDC| dispatchers.topic |新增|控制 TiCDC 将增量数据分发到不同 Kafka Topic 的策略| |TiCDC| dispatchers.partition |新增| DISCOURSE_PLACEHOLDER_220 是原 dispatchers.dispatcher 配置项的别名,用于控制增量数据的 Kafka Partition 分发策略。| |TiCDC| schema-registry |新增|用于指定存储 Avro Schema 的 Schema Registry Endpoint。| |DM| DISCOURSE_PLACEHOLDER_222 命令中的 worker 参数|删除|不推荐使用的方式,将通过更为简单的实现替代。| |DM|source 配置中的 relay-dir |删除|由 worker 配置文件中的同名配置项替代。| |DM|task 配置中的 DISCOURSE_PLACEHOLDER_224 |删除|由 shard-mode 配置项替代。| |DM|task 配置中的 auto-fix-gtid |删除|该配置已在 5.x 版本废弃,v6.1.0 正式移除。| |DM|source 配置中的 DISCOURSE_PLACEHOLDER_227 、 DISCOURSE_PLACEHOLDER_228 |删除|该配置已在 5.x 版本废弃,v6.1.0 正式移除。|
8.2. 升级前准备
8.2.1. 更新 TiUP 离线镜像
- 更新离线镜像
官方下载页面,下载 TiDB 6.1 版离线镜像 tidb-community-server-v6.1.0-linux-amd64.tar.gz ,上传至中控机。按如下方式,完成镜像的覆盖升级。
~]$ tar xzvf tidb-community-server-v6.1.0-linux-amd64.tar.gz
~]$ sh tidb-community-server-v6.1.0-linux-amd64/local_install.sh
~]$ source /home/tidb/.bash_profile
关于 TiDB-community-server 软件包和 DISCOURSE_PLACEHOLDER_232 软件包的内容物,可查看 https://github.com/pingcap/docs-cn/blob/release-6.1/binary-package.md
若需要升级工具包,则下载 DISCOURSE_PLACEHOLDER_233 ,并上传至中控机。按如下方式,将 server 和 toolkit 两个离线镜像合并。
DISCOURSE_PLACEHOLDER_234
- 升级 cluster 组件
DISCOURSE_PLACEHOLDER_235
8.2.2. 修改存在冲突的配置项
通过命令 DISCOURSE_PLACEHOLDER_236 载入 TiDB 集群配置,修改存在冲突的配置项。若原集群未修改过默认的配置参数,可忽略此步骤。
DISCOURSE_PLACEHOLDER_237
以下 TiKV 参数在 TiDB v5.0 已废弃。如果在原集群配置过以下参数,需要通过 edit-config 编辑模式删除这些参数:
-
pessimistic-txn.enabled
-
server.request-batch-enable-cross-command
-
server.request-batch-wait-duration
8.2.3. 集群健康检查
升级前,通过 tiup cluster check <集群名> --cluster 对集群当前的 region 健康状态进行检查。
DISCOURSE_PLACEHOLDER_239
如果结果为 " DISCOURSE_PLACEHOLDER_240 ",则说明当前集群中所有 region 均为健康状态,可以继续执行升级;
如果结果为 " Regions are not fully healthy: m miss-peer, n pending-peer " 并提示 " DISCOURSE_PLACEHOLDER_242 ",则说明当前集群中有 region 处在异常状态,应先排除相应异常状态。
8.3. 升级集群
8.3.1. 停机升级
# 1. 关闭 TiDB 集群
~]$ tiup cluster stop kruidb-cluster

# 2. 升级 TiDB 集群
~]$ tiup cluster upgrade kruidb-cluster v6.1.0 --offline# 3. 启动 TiDB 集群
~]$ tiup cluster start kruidb-cluster
8.3.2. 不停机升级
DISCOURSE_PLACEHOLDER_244
升级 TiKV 期间,会逐个将 TiKV 上的所有 Leader 切走再停止该 TiKV 实例。默认超时时间为 5 分钟(300 秒),超时后会直接停止该实例。可通过 DISCOURSE_PLACEHOLDER_245 将超时时间指定为一个更大的值,如 DISCOURSE_PLACEHOLDER_246 ,单位为秒。
若想将 TiFlash 从 5.3 之前的版本升级到 5.3 及之后的版本,必须进行 TiFlash 的停机升级。步骤如下:
# 1. 关闭 TiFlash 实例
~]$ tiup cluster stop kruidb-cluster -R tiflash

# 2. --offline 以不重启的方式,升级 TiDB 集群
~]$ tiup cluster upgrade kruidb-cluster v5.4.2 --offline

# 3. reload 集群,TiFlash 也会正常启动
~]$ tiup cluster reload kruidb-cluster
8.4. 升级验证
~]$ tiup cluster display kruidb-cluster
tiup is checking updates for component cluster ...
Starting component `cluster`: /home/tidb/.tiup/components/cluster/v1.10.2/tiup-cluster display kruidb-cluster
Cluster type:       tidb
Cluster name:       kruidb-cluster
Cluster version:    v6.1.0
Deploy user:        tidb
SSH type:           builtin
Dashboard URL:      http://192.168.3.222:2379/dashboard
Grafana URL:        http://192.168.3.221:3000
ID                   Role          Host           Ports        OS/Arch       Status   Data Dir                      Deploy Dir
--                   ----          ----           -----        -------       ------   --------                      ----------
192.168.3.221:9093   alertmanager  192.168.3.221  9093/9094    linux/x86_64  Up       /tidb-data/alertmanager-9093  /tidb-deploy/alertmanager-9093
192.168.3.221:3000   grafana       192.168.3.221  3000         linux/x86_64  Up       -                             /tidb-deploy/grafana-3000
192.168.3.221:2379   pd            192.168.3.221  2379/2380    linux/x86_64  Up       /tidb-data/pd-2379            /tidb-deploy/pd-2379
192.168.3.222:2379   pd            192.168.3.222  2379/2380    linux/x86_64  Up|L|UI  /tidb-data/pd-2379            /tidb-deploy/pd-2379
192.168.3.223:2379   pd            192.168.3.223  2379/2380    linux/x86_64  Up       /tidb-data/pd-2379            /tidb-deploy/pd-2379
192.168.3.221:9090   prometheus    192.168.3.221  9090/12020   linux/x86_64  Up       /tidb-data/prometheus-9090    /tidb-deploy/prometheus-9090
192.168.3.221:4000   tidb          192.168.3.221  4000/10080   linux/x86_64  Up       -                             /tidb-deploy/tidb-4000
192.168.3.222:4000   tidb          192.168.3.222  4000/10080   linux/x86_64  Up       -                             /tidb-deploy/tidb-4000
192.168.3.223:4000   tidb          192.168.3.223  4000/10080   linux/x86_64  Up       -                             /tidb-deploy/tidb-4000
192.168.3.224:20160  tikv          192.168.3.224  20160/20180  linux/x86_64  Up       /tidb-data/tikv-20160         /tidb-deploy/tikv-20160
192.168.3.225:20160  tikv          192.168.3.225  20160/20180  linux/x86_64  Up       /tidb-data/tikv-20160         /tidb-deploy/tikv-20160
192.168.3.226:20160  tikv          192.168.3.226  20160/20180  linux/x86_64  Up       /tidb-data/tikv-20160         /tidb-deploy/tikv-20160
Total nodes: 12
``` > topology.yaml