一、背景 / 目的
在实际部署 TiDB 集群时,可能初始分配的机器配置较高,但由于集群刚上线业务量不大,且需要兼顾考虑集群物理层面的高可用,所以最初采用了单机单 TiKV 实例的部署方式。后续随着业务量的增长,并为了充分利用机器资源,需要将当前单机单 TiKV 实例部署调整为单机多 TiKV 实例部署。本文档提供了该场景下使用 TiUP 进行调整的参考手册。
二、相关概念及原理解释
单机多实例部署时,需要给 TiKV 节点打上 label 标签。PD 理解 TiKV 拓扑结构后,会根据提供的拓扑信息作出最优的调度。相关原理可参考 集群拓扑信息详解 。
三、操作前 Check 项
3.1 检查机器资源,确保单机可以部署多个 tikv 实例
- 每个实例能分配 16c,32G 内存
- 单个 tikv 硬盘大小配置建议 PCI-E SSD 不超过 2 TB,普通 SSD 不超过 1.5 TB,需要确认磁盘、IO 足够(可单盘或者多盘)
3.2 端口预留,检查端口是否被占用,当前是否可用等
shell> netstat -anp |grep 端口号(如 tikv_port、tikv_status_port)
3.3 检查集群当前的状态是否正常
- 监控面板:查看 cluster-overview → service port status 服务是否正常。
- pd-ctl:执行 health 显示集群健康信息
- tiup cluster display {cluster-name}
四、注意事项
-
label 要和真实物理拓扑一致,否则标签无意义;
-
单机单实例部署调整为单机多实例部署时,同一台机器上注意区分 deploy_dir、端口、labels 标签;
- 同一个机器上部署多个 tikv 节点时,新的 tikv 需要使用不同的 depoly_dir、端口等
-
集群配置文件中 replication.location-labels 参数值确保与 TiKV 中的 label 一致
-
可以通过 pd-ctl 调低调度参数,防止 balance 过快:
- leader-schedule-limit:控制 transfer leader 调度的并发数
- region-schedule-limit:控制增删 peer 调度的并发数
- replica-schedule-limit:控制同时进行 replica 调度的任务个数
五、操作步骤
5.1 集群拓扑信息
当前集群没有打 label
[tidb@tidb122 ~]$ tiup ctl pd -u 172.16.4.122:2379 -i
Starting component `ctl`: /home/tidb/.tiup/components/ctl/v4.0.8/ctl pd -u 172.16.4.122:2379 -i
» label
null

» config show replication
{
  "max-replicas": 3,
  "location-labels": "",
  "strictly-match-label": "false"
}
调整目标:将单机单 tikv 实例调整为单机两 tikv 实例
5.2 操作中的关键步骤
1.缩减 TiKV 实例的内存和 CPU 配置
通过 tiup cluster edit-config {cluster-name} 修改内存和 CPU 相关配置:
- storage.block-cache.capacity = MEM_TOTAL * 0.45 / TiKV 实例数量
- 若没有启用统一线程池:
- 参数 high-concurrency、normal-concurrency 和 low-concurrency 调整为:CPU 核心数量 * 0.8 / TiKV 实例数量
- 若启用了统一线程池:
- readpool.unified.max-thread-count = ( CPU 核心数量 * 0.8 / TiKV 实例数量)
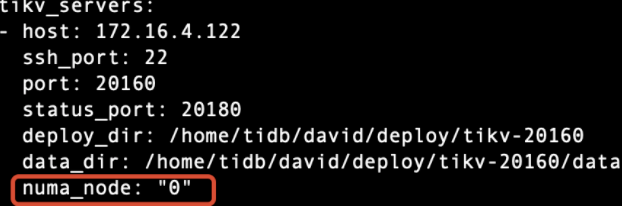
2.进行 NUMA 绑核
- 安装 numactl
- tiup cluster exec {cluster-name} --sudo --command “yum -y install numactl”
- 在实例参数模块配置对应的 numa_node 参数,并添加对应的物理 CPU 的核数
- tiup cluster edit-config {cluster-name}
- numa_node 这个配置参数与 numactl --cpunodebind 配置对应

说明:本次测试由于服务器 cpunode 只有 1 个,因此配置文件中未进行配置,实操时请根据生产实际资源情况进行配置
3.在当前 TiKV 节点上打 label (若已经打过 label 可忽略该步骤)
- 配置文件中添加标签信息
[tidb@tidb122 ~]$ tiup cluster edit-config tidb-test

tikv_servers:
- host: 172.16.4.122
  ssh_port: 22
  port: 20160
  status_port: 20180
  deploy_dir: /home/tidb/david/deploy/tikv-20160
  data_dir: /home/tidb/david/deploy/tikv-20160/data
  arch: amd64
  os: linux
  config:
    server.labels:
      host: tikv1
- host: 172.16.4.147
  ssh_port: 22
  port: 20160
  status_port: 20180
  deploy_dir: /home/tidb/david/deploy/tikv-20160
  data_dir: /home/tidb/david/deploy/tikv-20160/data
  arch: amd64
  os: linux
  config:
    server.labels:
      host: tikv2
- host: 172.16.4.210
  ssh_port: 22
  port: 20160
  status_port: 20180
  deploy_dir: /home/tidb/david/deploy/tikv-20160
  data_dir: /home/tidb/david/deploy/tikv-20160/data
  arch: amd64
  os: linux
  config:
    server.labels:
      host: tikv3
- reload 集群
[tidb@tidb122 ~]$ tiup cluster reload tidb-test
- 设置 PD label 信息
[tidb@tidb122 ~]$ tiup ctl pd -u 172.16.4.122:2379 -i
Starting component `ctl`: /home/tidb/.tiup/components/ctl/v4.0.8/ctl pd -u 172.16.4.122:2379 -i
» config set replication.location-labels "host"
Success!
说明:
- 在 PD 集群初始化完成后配置 label ,需要使用 pd-ctl 工具进行在线更改;
- 若在集群初始化之前,可以通过 PD 的配置文件进行配置。
- 确认标签已经成功打上
[tidb@tidb122 ~]$ tiup ctl pd -u 172.16.4.122:2379 -i
Starting component `ctl`: /home/tidb/.tiup/components/ctl/v4.0.8/ctl pd -u 172.16.4.122:2379 -i
[
  {
    "key": "host",
    "value": "tikv2"
  },
  {
    "key": "host",
    "value": "tikv1"
  },
  {
    "key": "host",
    "value": "tikv3"
  }
]

» config show replication
{
  "max-replicas": 3,
  "location-labels": "host",
  "strictly-match-label": "false",
  "enable-placement-rules": "false"
}

» store
{
  "count": 3,
  "stores": [
    {
      "store": {
        "id": 1,
        "address": "172.16.4.147:20160",
        "labels": [
          {
            "key": "host",
            "value": "tikv2"
          }
        ],
       ...省略...
      }
    },
    {
      "store": {
        "id": 4,
        "address": "172.16.4.122:20160",
        "labels": [
          {
            "key": "host",
            "value": "tikv1"
          }
        ],
       ...省略...
      }
    },
    {
      "store": {
        "id": 5,
        "address": "172.16.4.210:20160",
        "labels": [
          {
            "key": "host",
            "value": "tikv3"
          }
        ],
        ...省略...
    }
  ]
}
4.扩容新 TiKV 节点
1)准备扩容的配置文件
[tidb@tidb122 ~]$ cat scale-out-tikv.yaml
tikv_servers:
- host: 172.16.4.122
  ssh_port: 22
  port: 21160
  status_port: 21180
  deploy_dir: /home/tidb/david2/deploy/tikv-20160
  data_dir: /home/tidb/david2/deploy/tikv-20160/data
  config:
    server.labels:
      host: tikv1
  arch: amd64
  os: linux
- host: 172.16.4.147
  ssh_port: 22
  port: 21160
  status_port: 21180
  deploy_dir: /home/tidb/david2/deploy/tikv-20160
  data_dir: /home/tidb/david2/deploy/tikv-20160/data
  config:
    server.labels:
      host: tikv2
  arch: amd64
  os: linux
- host: 172.16.4.210
  ssh_port: 22
  port: 21160
  status_port: 21180
  deploy_dir: /home/tidb/david2/deploy/tikv-20160
  data_dir: /home/tidb/david2/deploy/tikv-20160/data
  config:
    server.labels:
      host: tikv3
  arch: amd64
  os: linux
2)扩容 tikv 节点
[tidb@tidb122 ~]$ tiup cluster scale-out tidb-test scale-out-tikv.yaml
5.扩容完成后 check 项
1)扩容后的集群拓扑
2) 确认所有 tikv 节点均已打上标签
[tidb@tidb122 ~]$ tiup ctl pd -u 172.16.4.122:2379 label store
Starting component `ctl`: /home/tidb/.tiup/components/ctl/v4.0.8/ctl pd -u 172.16.4.122:2379 label store
{
  "count": 6,
  "stores": [
    {
      "store": {
        "id": 1001,
        "address": "172.16.4.122:21160",
        "labels": [
          {
            "key": "host",
            "value": "tikv1"
          }
        ],
。。。省略。。。
    },
    {
      "store": {
        "id": 1002,
        "address": "172.16.4.210:21160",
        "labels": [
          {
            "key": "host",
            "value": "tikv3"
          }
        ],
。。。省略。。。
    },
    {
      "store": {
        "id": 1003,
        "address": "172.16.4.147:21160",
        "labels": [
          {
            "key": "host",
            "value": "tikv2"
          }
        ],
。。。省略。。。
    },
    {
      "store": {
        "id": 1,
        "address": "172.16.4.122:20160",
        "labels": [
          {
            "key": "host",
            "value": "tikv1"
          }
        ],
。。。省略。。。
    },
    {
      "store": {
        "id": 4,
        "address": "172.16.4.147:20160",
        "labels": [
          {
            "key": "host",
            "value": "tikv2"
          }
        ],
。。。省略。。。
    },
    {
      "store": {
        "id": 5,
        "address": "172.16.4.210:20160",
        "labels": [
          {
            "key": "host",
            "value": "tikv3"
          }
        ],
。。。省略。。。
    }
  ]
}


