和文章配套的视频 TiDB v5.0.0 PCTP实验环境搭建(vmware虚拟机版)_哔哩哔哩_bilibili 也可直接点击下方链接
TiDB v5.0.0 PCTP实验环境搭建(vmware虚拟机版)
个人笔记本环境信息
硬件信息:16c16g 1T SSD
软件:VMware Workstation 15 Pro
ISO:镜像CentOS-7-x86_64-DVD-2003
tidb版本:tidb v5.0.0
虚拟机VM数量:5个
各个VM配置:2c2g 硬盘50G
各个节点信息:
| 组件 | 机器IP:端口 | 数量 |
|---|---|---|
| PD | 192.168.80.10:2379 | 1 |
| alertmanager | 1192.168.80.10::9093 | 1 |
| prometheus | 192.168.80.10::9090 | 1 |
| grafana | 192.168.80.10::3000 | 1 |
| TiKV1 | 192.168.80.11:20160 | 1 |
| TiKV2 | 192.168.80.12:20160 | 1 |
| TiDB server | 192.168.80.13:4000 | 1 |
| MySQL Client or Mycli | 192.168.80.13 | 1 |
| Tiflash | 192.168.80.14 | 1 |
[root@PD ~]# cat /etc/redhat-release
CentOS Linux release 7.8.2003 (Core)
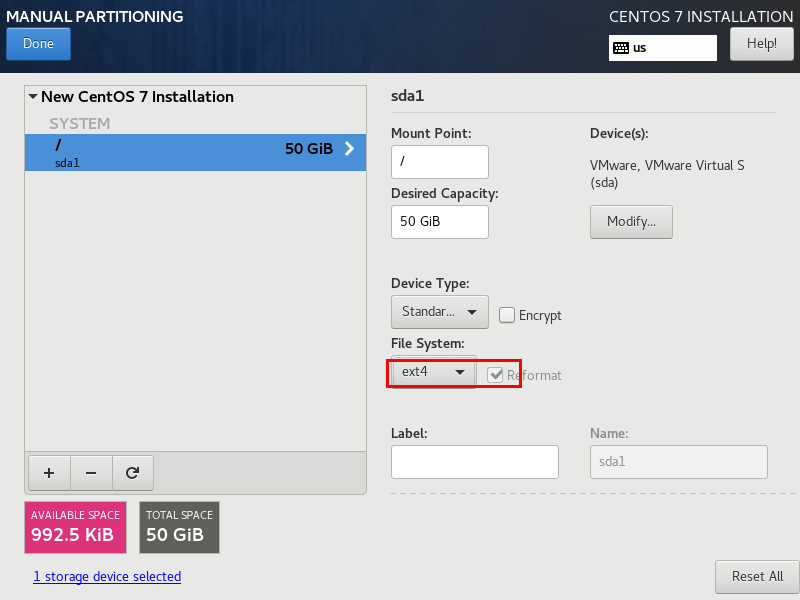
虚拟机最小化安装,网卡static,硬盘分区如下图,先安装一个虚拟机pd当模板机,其他4个虚拟机完整克隆复制
虚拟机文件路径
D:\VMOS\pd

D:\VMOS\tikv\kv1
D:\VMOS\tikv\kv2
D:\VMOS\tidb
D:\VMOS\tiflash
模板机配置
检查和关闭防火墙
systemctl stop firewalld.service
systemctl disable firewalld.service
sed -i s#SELINUX=enforcing#SELINUX=disabled# /etc/selinux/config
setenforce  0
修改网络信息
这里因为pd作为tiup的跳板机需要上互联网,我配置一下
# vi /etc/sysconfig/network-scripts/ifcfg-ens32
BOOTPROTO=static
IPADDR=192.168.80.10
PREFIX=24
GATEWAY=192.168.80.2

重启网络服务
[root@PD ~]# systemctl restart network


echo "NETWORKING=yes">> /etc/sysconfig/network
echo "HOSTNAME=pd">> /etc/sysconfig/network
echo "GATEWAY=192.168.80.2">> /etc/sysconfig/network
[root@PD1 ~]# cat /etc/resolv.conf
nameserver 114.114.114.114
nameserver 8.8.8.8
nameserver 223.5.5.5

echo "nameserver 114.114.114.114">> /etc/resolv.conf
echo "nameserver 8.8.8.8">> /etc/resolv.conf
echo "nameserver 223.5.5.5">> /etc/resolv.conf

此时成功能上互联网
[root@pd ~]# ping www.asktug.com
PING asktug.com (106.75.123.60) 56(84) bytes of data.
64 bytes from 106.75.123.60 (106.75.123.60): icmp_seq=1 ttl=128 time=33.0 ms
64 bytes from 106.75.123.60 (106.75.123.60): icmp_seq=2 ttl=128 time=31.3 ms
^C
--- asktug.com ping statistics ---
2 packets transmitted, 2 received, 0% packet loss, time 1000ms
rtt min/avg/max/mdev = 31.330/32.168/33.006/0.838 ms
修改主机名hostname
查看当前主机名
# hostname
修改主hostname
#hostnamectl set-hostname pd
vi /etc/hosts
echo "192.168.80.10  pd">> /etc/hosts
安装yum依赖包
yum -y install numactl
yum -y install ntp ntpdate
设置NTP
查看ntp是否运行
systemctl status ntpd.service
systemctl start ntpd.service
systemctl enable ntpd.service
配置内核参数
echo "fs.file-max = 1000000">> /etc/sysctl.conf
echo "net.core.somaxconn = 32768">> /etc/sysctl.conf
echo "net.ipv4.tcp_tw_recycle = 0">> /etc/sysctl.conf
echo "net.ipv4.tcp_syncookies = 0">> /etc/sysctl.conf
echo "vm.overcommit_memory = 1">> /etc/sysctl.conf

sysctl -p
配置limits.conf
cat << EOF >>/etc/security/limits.conf
tidb           soft    nofile          1000000
tidb           hard    nofile          1000000
tidb           soft    stack          32768
tidb           hard    stack          32768
EOF
关闭THP和NUMA
vi  /etc/default/grub
在GRUB_CMDLINE_LINUX添加下列选项,用于关闭THP和NUMA
transparent_hugepage=never numa=off
[root@PD ~]# cat  /etc/default/grub
GRUB_TIMEOUT=5
GRUB_DISTRIBUTOR="$(sed 's, release .*$,,g' /etc/system-release)"
GRUB_DEFAULT=saved
GRUB_DISABLE_SUBMENU=true
GRUB_TERMINAL_OUTPUT="console"
GRUB_CMDLINE_LINUX="spectre_v2=retpoline rhgb quiet transparent_hugepage=never numa=off"
GRUB_DISABLE_RECOVERY="true"


vi /etc/rc.d/rc.local
1:新增:
#add
if test -f /sys/kernel/mm/transparent_hugepage/enabled; then
echo never > /sys/kernel/mm/transparent_hugepage/enabled
fi
if test -f /sys/kernel/mm/transparent_hugepage/defrag; then
echo never > /sys/kernel/mm/transparent_hugepage/defrag
fi
2:授权执行:
chmod +x /etc/rc.d/rc.local
3:重启后生效(这里先不要重启)
配置SSH
echo 'MaxSessions=40' >> /etc/ssh/sshd_config
echo 'PermitRootLogin yes' >> /etc/ssh/sshd_config
systemctl restart sshd
创建tidb用户
useradd tidb
echo "tidb:password" | chpasswd
配置文件系统为 ext4,参数nodelalloc,noatime
[root@PD ~]# df -h
Filesystem      Size  Used Avail Use% Mounted on
devtmpfs        980M     0  980M   0% /dev
tmpfs           991M     0  991M   0% /dev/shm
tmpfs           991M  9.5M  981M   1% /run
tmpfs           991M     0  991M   0% /sys/fs/cgroup
/dev/sda1        50G  1.5G   46G   4% /
tmpfs           199M     0  199M   0% /run/user/0

[root@PD ~]# cat /etc/fstab

#
# /etc/fstab
# Created by anaconda on Sat Feb 12 22:09:03 2022
#
# Accessible filesystems, by reference, are maintained under '/dev/disk'
# See man pages fstab(5), findfs(8), mount(8) and/or blkid(8) for more info
#
UUID=a0006175-f79e-4ebb-b1de-63160cd856bc /                       ext4    defaults        1 1

##############
[root@PD ~]# cat /etc/fstab

#
# /etc/fstab
# Created by anaconda on Sat Feb 12 22:09:03 2022
#
# Accessible filesystems, by reference, are maintained under '/dev/disk'
# See man pages fstab(5), findfs(8), mount(8) and/or blkid(8) for more info
#
UUID=a0006175-f79e-4ebb-b1de-63160cd856bc /                       ext4     defaults,nodelalloc,noatime        1 1
[root@PD ~]# lsblk -f
NAME   FSTYPE LABEL UUID                                 MOUNTPOINT
sda
└─sda1 ext4         a0006175-f79e-4ebb-b1de-63160cd856bc /
sr0
将模板机pd完整克隆其他4个节点
其他节点配置
修改克隆虚拟机网卡UUID、ip地址/hostname冲突
修改这个4个文件
#/etc/sysconfig/network-scripts/ifcfg-ens32
#/etc/resolv.conf
#/etc/hosts
#/etc/resolv.conf

其他4个节点配置
# uuidgen 获取随机网卡UUID
e88e1c6e-ec5c-4cce-b196-2c9b36a4a737

# vi /etc/sysconfig/network-scripts/ifcfg-ens32

BOOTPROTO=static
ONBOOT=yes
IPADDR=192.168.80.11 #根据您实际设置的ip更改
PREFIX=24
GATEWAY=192.168.80.2#根据您实际设置的ip更改


[root@PD ~]# systemctl restart network


echo "NETWORKING=yes">> /etc/sysconfig/network
#根据您实际设置的主机名更改
echo "HOSTNAME=tikv">> /etc/sysconfig/network
#根据您实际设置的ip更改
echo "GATEWAY=192.168.80.2">> /etc/sysconfig/network

[root@PD1 ~]# cat /etc/sysconfig/network
# Created by anaconda
#add
NETWORKING=yes
HOSTNAME=tikv
GATEWAY=192.168.80.2

修改hostname

# hostname

查看当前主机名

#hostnamectl set-hostname tikv

修改主机名
vi /etc/hosts

echo "192.168.80.11   tikv1">> /etc/hosts

echo "nameserver 114.114.114.114">> /etc/resolv.conf
echo "nameserver 8.8.8.8">> /etc/resolv.conf
echo "nameserver 223.5.5.5">> /etc/resolv.conf
[root@PD1 ~]# cat /etc/resolv.conf
nameserver 114.114.114.114
nameserver 8.8.8.8
nameserver 223.5.5.5

#其他节点tikv2、tidb、tiflash按照实际更改,此处省略
使用TiUP安装并下载tiup工具
[root@pd ~]# curl --proto '=https' --tlsv1.2 -sSf https://tiup-mirrors.pingcap.com/install.sh | sh
  % Total    % Received % Xferd  Average Speed   Time    Time     Time  Current
                                 Dload  Upload   Total   Spent    Left  Speed
100 7053k  100 7053k    0     0  5857k      0  0:00:01  0:00:01 --:--:-- 5858k
WARN: adding root certificate via internet: https://tiup-mirrors.pingcap.com/root.json
You can revoke this by remove /root/.tiup/bin/7b8e153f2e2d0928.root.json
Successfully set mirror to https://tiup-mirrors.pingcap.com
Detected shell: bash
Shell profile:  /root/.bash_profile
/root/.bash_profile has been modified to add tiup to PATH
open a new terminal or source /root/.bash_profile to use it
Installed path: /root/.tiup/bin/tiup
===============================================
Have a try:     tiup playground
===============================================
tiup环境变量
下载完成后根据提示再设置一下环境变量,这样就可以使用tiup了。
[root@pd ~]# source /root/.bash_profile
[root@pd ~]# which tiup
/root/.tiup/bin/tiup
安装TiUP cluster组件
[root@pd ~]# tiup cluster
The component `cluster` version  is not installed; downloading from repository.

Usage:
  tiup cluster [command]

Use "tiup cluster help [command]" for more information about a command.
更新TiUP Cluster到最新的版本
[root@pd ~]# tiup update --self && tiup update cluster

/root/.tiup/components/cluster/v1.9.0/tiup-cluster
Updated successfully!
查看TiUP Cluster的版本
[root@pd ~]# tiup --binary cluster
/root/.tiup/components/cluster/v1.9.0/tiup-cluster
根据模板修改拓扑文件
[root@pd ~]# tiup cluster template > topology.yaml
tiup跳板机、prometheus、grafana、alertmanager都和PD部署在一台机器上192.168.80.10
mycli和tidb-server部署在一台机器上192.168.80.13
vi topology.yaml

# # Server configs are used to specify the configuration of PD Servers.
pd_servers:
  # # The ip address of the PD Server.
  - host: 192.168.80.10

# # Server configs are used to specify the configuration of TiDB Servers.
tidb_servers:
  # # The ip address of the TiDB Server.
  - host: 192.168.80.13

# # Server configs are used to specify the configuration of TiKV Servers.
tikv_servers:
  # # The ip address of the TiKV Server.
  - host: 192.168.80.11
  - host: 192.168.80.12

# # Server configs are used to specify the configuration of TiFlash Servers.
tiflash_servers:
  # # The ip address of the TiFlash Server.
  - host: 192.168.80.14


# # Server configs are used to specify the configuration of Prometheus Server.
monitoring_servers:
  # # The ip address of the Monitoring Server.
  - host: 192.168.80.10

# # Server configs are used to specify the configuration of Grafana Servers.
grafana_servers:
  # # The ip address of the Grafana Server.
  - host: 192.168.80.10

# # Server configs are used to specify the configuration of Alertmanager Servers.
alertmanager_servers:
  # # The ip address of the Alertmanager Server.
  - host: 192.168.80.10
安装之前先check一下,查看是否有什么地方配置不正确,如果有fail处,再次check一下,可以修复部分fail,直到没有fail为止
[root@PD ~]# tiup cluster check ./topology.yaml --apply --user root -p
tiup is checking updates for component cluster ...
Starting component `cluster`: /root/.tiup/components/cluster/v1.9.0/tiup-cluster /root/.tiup/components/cluster/v1.9.0/tiup-cluster check ./topology.yaml --apply --user root -p
Input SSH password:


+ Detect CPU Arch
  - Detecting node 192.168.80.10 ... Done
  - Detecting node 192.168.80.11 ... Done
  - Detecting node 192.168.80.12 ... Done
  - Detecting node 192.168.80.13 ... Done
...
SSH手动互信
以下所有节点都要配置
#每个节点生成秘钥文件
ssh-keygen -t rsa
#把每个节点生成秘钥文件发到各个节点
ssh-copy-id -i ~/.ssh/id_rsa.pub 192.168.80.10
ssh-copy-id -i ~/.ssh/id_rsa.pub 192.168.80.11
ssh-copy-id -i ~/.ssh/id_rsa.pub 192.168.80.12
ssh-copy-id -i ~/.ssh/id_rsa.pub 192.168.80.13

#ssh各个节点无需输入密码互信成功
ssh 192.168.80.10
ssh 192.168.80.11
ssh 192.168.80.12
ssh 192.168.80.13
部署tidb5.0.0
 tiup cluster deploy tidb-test v5.0.0 ./topology.yaml --user root -p
 [root@PD ~]# tiup cluster deploy tidb-test v5.0.0 ./topology.yaml --user root -p
tiup is checking updates for component cluster ...
Starting component `cluster`: /root/.tiup/components/cluster/v1.9.0/tiup-cluster /root/.tiup/components/cluster/v1.9.0/tiup-cluster deploy tidb-test v5.0.0 ./topology.yaml --user root -p
Input SSH password:


Cluster `tidb-test` deployed successfully, you can start it with command: `tiup cluster start tidb-test --init`
tidb5.0.0初始化
[root@PD ~]# tiup cluster start tidb-test --init
tiup is checking updates for component cluster ...
Starting component `cluster`: /root/.tiup/components/cluster/v1.9.0/tiup-cluster /root/.tiup/components/cluster/v1.9.0/tiup-cluster start tidb-test --init
Starting cluster tidb-test...

Started cluster `tidb-test` successfully
The root password of TiDB database has been changed.
The new password is: '8%MW410XPg$&3aT+t9'. 这里会生成一个临时密码,非常重要
Copy and record it to somewhere safe, it is only displayed once, and will not be stored.
The generated password can NOT be get and shown again.
查看集群的列表
[root@PD ~]# tiup cluster list
tiup is checking updates for component cluster ...
Starting component `cluster`: /root/.tiup/components/cluster/v1.9.0/tiup-cluster /root/.tiup/components/cluster/v1.9.0/tiup-cluster list
Name       User  Version  Path                                            PrivateKey
----       ----  -------  ----                                            ----------
tidb-test  tidb  v5.0.0   /root/.tiup/storage/cluster/clusters/tidb-test  /root/.tiup/storage/cluster/clusters/tidb-test/ssh/id_rs
查看集群tidb-test的成员信息
[root@PD ~]# tiup cluster display tidb-test
tiup is checking updates for component cluster ...
Starting component `cluster`: /root/.tiup/components/cluster/v1.9.0/tiup-cluster /root/.tiup/components/cluster/v1.9.0/tiup-cluster display tidb-test
Cluster type:       tidb
Cluster name:       tidb-test
Cluster version:    v5.0.0
Deploy user:        tidb
SSH type:           builtin
Dashboard URL:      http://192.168.80.10:2379/dashboard
ID                   Role          Host           Ports                            OS/Arch       Status   Data Dir                                  Deploy Dir
--                   ----          ----           -----                            -------       ------   --------                                  ----------
192.168.80.10:9093   alertmanager  192.168.80.10  9093/9094                        linux/x86_64  Up       /home/tidb/deploy/alertmanager-9093/data  /home/tidb/deploy/alertmanager-9093
192.168.80.10:3000   grafana       192.168.80.10  3000                             linux/x86_64  Up       -                                         /home/tidb/deploy/grafana-3000
192.168.80.10:2379   pd            192.168.80.10  2379/2380                        linux/x86_64  Up|L|UI  /home/tidb/deploy/pd-2379/data            /home/tidb/deploy/pd-2379
192.168.80.10:9090   prometheus    192.168.80.10  9090                             linux/x86_64  Up       /home/tidb/deploy/prometheus-9090/data    /home/tidb/deploy/prometheus-9090
192.168.80.12:4000   tidb          192.168.80.12  4000/10080                       linux/x86_64  Up       -                                         /home/tidb/deploy/tidb-4000
192.168.80.13:9000   tiflash       192.168.80.13  9000/8123/3930/20170/20292/8234  linux/x86_64  Up       /home/tidb/deploy/tiflash-9000/data       /home/tidb/deploy/tiflash-9000
192.168.80.11:20160  tikv          192.168.80.11  20160/20180                      linux/x86_64  Up       /home/tidb/deploy/tikv-20160/data         /home/tidb/deploy/tikv-20160
Total nodes: 7
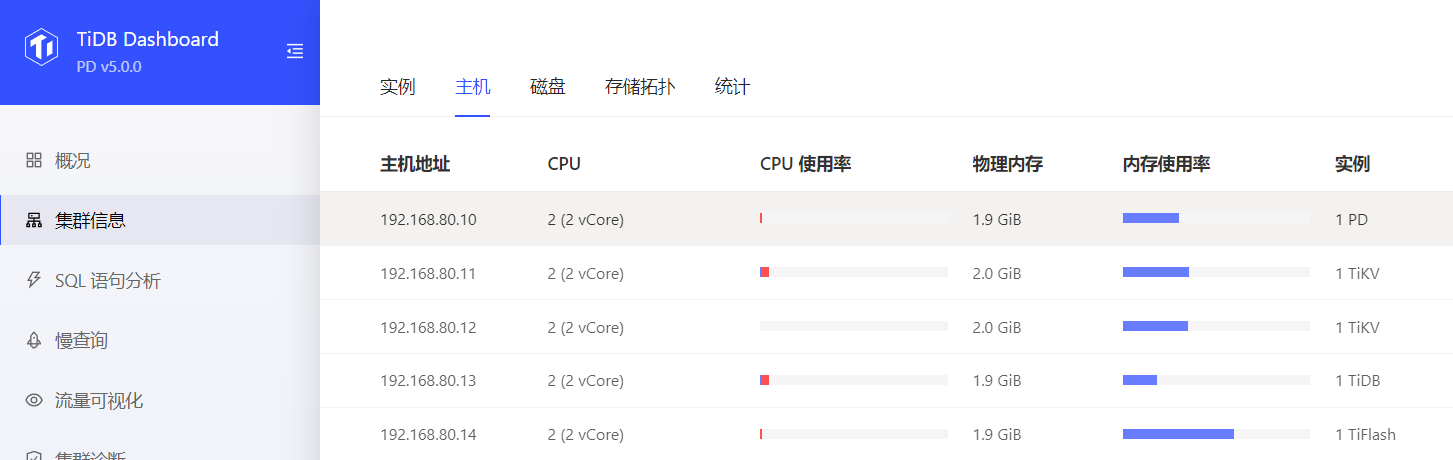
tidb集群系统监控
初始化生成的临时密码8%MW410XPg$&3aT+t9
dashboard: http://192.168.80.10:2379/dashboard
账号root
密码8%MW410XPg$&3aT+t9

Grafana: http://192.168.80.10:3000
账号admin
密码admin


##这里安装MySQL Client和Mycli都可以
安装MySQL Client
[root@tidb ~]# yum  -y install mysql


Installed:
  mariadb.x86_64 1:5.5.68-1.el7       #CentOS7.8默认安装 mariadb


Complete!

[root@tidb ~]# mysql -h 127.0.0.1 -P 4000 -u root -p
Enter password:
Welcome to the MariaDB monitor.  Commands end with ; or \g.
Your MySQL connection id is 7
Server version: 5.7.25-TiDB-v5.0.0 TiDB Server (Apache License 2.0) Community Edition, MySQL 5.7 compatible

Copyright (c) 2000, 2018, Oracle, MariaDB Corporation Ab and others. #CentOS7.8默认安装 mariadb

Type 'help;' or '\h' for help. Type '\c' to clear the current input statement.

MySQL [(none)]> show databases;
+--------------------+
| Database           |
+--------------------+
| INFORMATION_SCHEMA |
| METRICS_SCHEMA     |
| PERFORMANCE_SCHEMA |
| mysql              |
| test               |
+--------------------+
5 rows in set (0.00 sec)

MySQL [(none)]> select user,host from mysql.user;
+------+------+
| user | host |
+------+------+
| root | %    |
+------+------+
1 row in set (0.00 sec)

MySQL [(none)]> \q
Bye
安装Mycli/
cat /etc/redhat-release
CentOS Linux release 7.8.2003 (Core)

0.安装yum依赖包
yum -y install libffi-devel zlib* python-devel openssl-devel gcc

1.配置阿里pip仓库
mkdir ~/.pip/
cat > ~/.pip/pip.conf <<EOF
[global]
index-url = https://mirrors.aliyun.com/pypi/simple/
[install]
trusted-host=mirrors.aliyun.com
EOF

[root@tidb ~]# cat ~/.pip/pip.conf
[global]
index-url = https://mirrors.aliyun.com/pypi/simple/
[install]
trusted-host=mirrors.aliyun.com

2.安装python3.9

tar -zxf Python-3.9.0.tgz
cd Python-3.9.0/
./configure --prefix=/usr/local/python
make && make install

3.配置mycli环境变量

/usr/local/python/bin/添加到环境变量里
[root@tidb ~]# cat .bash_profile
# .bash_profile

# Get the aliases and functions
if [ -f ~/.bashrc ]; then
        . ~/.bashrc
fi

# User specific environment and startup programs

PATH=$PATH:$HOME/bin:/usr/local/python/bin/ 此处后面添加

export PATH
[root@tidb ~]# source .bash_profile

4.pip安装mycli
pip3 install mycli
[root@tidb ~]# mycli -uroot -P4000
Password:
MySQL 5.7.25
mycli 1.24.3
Home: http://mycli.net
Bug tracker: https://github.com/dbcli/mycli/issues
Thanks to the contributor - Sudaraka Wijesinghe


MySQL root@localhost:(none)> set password="123456";
Query OK, 0 rows affected
Time: 0.022s
MySQL root@localhost:(none)> \q
Goodbye!

[root@tidb ~]# mycli -uroot -P4000 -p123456
MySQL 5.7.25
mycli 1.24.3
Home: http://mycli.net
Bug tracker: https://github.com/dbcli/mycli/issues
Thanks to the contributor - Adam Chainz
MySQL root@localhost:(none)>
TiDB 数据库实验
MySQL root@localhost:(none)> show databases;
+--------------------+
| Database           |
+--------------------+
| INFORMATION_SCHEMA |
| METRICS_SCHEMA     |
| PERFORMANCE_SCHEMA |
| mysql              |
| test               |
+--------------------+
5 rows in set
Time: 0.010s
MySQL root@localhost:(none)> use test;
You are now connected to database "test" as user "root"
Time: 0.001s
MySQL root@localhost:test> show tables;
+----------------+
| Tables_in_test |
+----------------+
+----------------+
0 rows in set
Time: 0.005s
MySQL root@localhost:test> CREATE TABLE noncluster_order(
                        -> id bigint(20) unsigned AUTO_INCREMENT NOT NULL,
                        -> code varchar(30) NOT NULL,
                        -> order_no varchar(200) NOT NULL DEFAULT '',
                        -> status int(4) NOT NULL,
                        -> cancle_flag int(4) DEFAULT NULL,
                        -> create_user varchar(50) DEFAULT NULL,
                        -> update_user varchar(50) DEFAULT NULL,
                        -> create_time datetime DEFAULT NULL,
                        -> update_time datetime DEFAULT NULL,
                        -> PRIMARY KEY (id) NONCLUSTERED
                        -> )ENGINE=InnoDB SHARD_ROW_ID_BITS=4 PRE_SPLIT_REGIONS=3;
Query OK, 0 rows affected
Time: 0.088s


MySQL root@localhost:test> SHOW CREATE TABLE noncluster_order\G
sh: more: command not found
***************************[ 1. row ]***************************
Table        | noncluster_order
Create Table | CREATE TABLE `noncluster_order` (
  `id` bigint(20) unsigned NOT NULL AUTO_INCREMENT,
  `code` varchar(30) NOT NULL,
  `order_no` varchar(200) NOT NULL DEFAULT '',
  `status` int(4) NOT NULL,
  `cancle_flag` int(4) DEFAULT NULL,
  `create_user` varchar(50) DEFAULT NULL,
  `update_user` varchar(50) DEFAULT NULL,
  `create_time` datetime DEFAULT NULL,
  `update_time` datetime DEFAULT NULL,
  PRIMARY KEY (`id`) /*T![clustered_index] NONCLUSTERED */
) ENGINE=InnoDB DEFAULT CHARSET=utf8mb4 COLLATE=utf8mb4_bin/*!90000 SHARD_ROW_ID_BITS=4 PRE_SPLIT_REGIONS=3 */

1 row in set
Time: 0.002s
文章到此结束,预祝小伙伴们PCTP顺利通关!GO!GO!GO!
文末赠送快速安装一台网络DHCP的cenos7.8模版机,复制多个节点,造成UUID和IP冲突修复脚本
#!/bin/bash

#安装net-tools软件
/usr/bin/yum install net-tools
systemctl stop firewalld.service
systemctl disable firewalld.service
setenforce  0

#调整eth0文件
sed -i s#SELINUX=enforcing#SELINUX=disabled# /etc/selinux/config


cat /etc/selinux/config | grep SELINUX=
getenforce

/usr/bin/sed -i "/^IPV6/d" /etc/sysconfig/network-scripts/ifcfg-ens32
/usr/bin/sed -i "s/dhcp/static/g" /etc/sysconfig/network-scripts/ifcfg-ens32
#/usr/bin/sed -i "s/ONBOOT=no /ONBOOT=yes/g" /etc/sysconfig/network-scripts/ifcfg-ens32
/usr/bin/sed -i "s/UUID/#UUID/g" /etc/sysconfig/network-scripts/ifcfg-ens32
#IP地址:
/usr/sbin/ip add | grep "scope global dynamic ens32" | awk -F' ' '{print $2}' | awk -F'/' '{print "IPADDR="$1}' >> /etc/sysconfig/network-scripts/ifcfg-ens32
#子网掩码:
/usr/bin/echo "NETMASK=255.255.255.0" >> /etc/sysconfig/network-scripts/ifcfg-ens32
#网关:
/usr/bin/cat /etc/resolv.conf | grep nameserver | awk -F' ' '{print "GATEWAY="$2}' >> /etc/sysconfig/network-scripts/ifcfg-ens32
#DNS:
/usr/bin/cat /etc/resolv.conf | grep nameserver | awk -F' ' '{print "DNS1="$2}' >> /etc/sysconfig/network-scripts/ifcfg-ens32
#重启网络:
/usr/bin/systemctl stop NetworkManager
/usr/bin/systemctl disable NetworkManager
/usr/bin/systemctl restart network

LS_COLORS='no=00:fi=00:di=01;33;40:ln=01;36;40:'
export LS_COLORS
export PS1='[\u@\[\033[32m\]\h\[\033[0m\] \[\033[35m\]\w\[\033[0m\]]\$'
echo "alias ll='ls -lrtha'" >>/root/.bashrc
#echo "alias vi=vim" >>/root/.bashrc
source /root/.bashrc
ping www.asktug.com