【 TiDB 使用环境】单机多实例模拟生产环境,公司不提供root密码
【 TiDB 版本】v7.5.0
【复现路径】做过哪些操作出现的问题
1.使用ssh 192.168.36.61连接,192.168.36.61用户是deployer,没有sudo权限,没有root密码
按照文档使用 TiUP 单机多实例部署 TiDB 集群,在第 4 步:执行部署命令
tiup cluster check ./topology.yaml --user root
时,没有使用安全认证方式,文档中提示两种认证方式不清楚如何生成。
文档通过 TiUP 进行集群部署可以使用密钥或者交互密码方式来进行安全认证:
如果是密钥方式,可以通过 -i 或者 --identity_file 来指定密钥的路径。请问该密钥如何生成?
如果是密码方式,可以通过 -p 进入密码交互窗口。请问该SSH Password如何生成?
【遇到的问题:问题现象及影响】
执行命令时日志出现如下错误。依据个人猜测大致意思是在连接 ssh: unable to authenticate, attempted methods [none publickey], no supported methods remain。无法认证192.168.36.61。
2024-02-02T17:05:09.862+0800 INFO Execute command finished {“code”: 1, “error”: “failed to fetch cpu-arch or kernel-name: executor.ssh.execute_failed: Failed to exe cute command over SSH for ‘root@192.168.36.61:22’ {ssh_stderr: , ssh_stdout: , ssh_command: export LANG=C; PATH=$PATH:/bin:/sbin:/usr/bin:/usr/sbin uname -m}, cause: ssh: handsh ake failed: ssh: unable to authenticate, attempted methods [none publickey], no supported methods remain”, “errorVerbose”: “executor.ssh.execute_failed: Failed to execute comman d over SSH for ‘root@192.168.36.61:22’ {ssh_stderr: , ssh_stdout: , ssh_command: export LANG=C; PATH=$PATH:/bin:/sbin:/usr/bin:/usr/sbin uname -m}, cause: ssh: handshake failed: ssh: unable to authenticate, attempted methods [none publickey], no supported methods remain\n at github.com/pingcap/tiup/pkg/cluster/executor.(*EasySSHExecutor).Execute()\n\tg ithub.com/pingcap/tiup/pkg/cluster/executor/ssh.go:174\n at github.com/pingcap/tiup/pkg/cluster/executor.(*CheckPointExecutor).Execute()\n\tgithub.com/pingcap/tiup/pkg/cluster/e xecutor/checkpoint.go:86\n at github.com/pingcap/tiup/pkg/cluster/task.(*Shell).Execute()\n\tgithub.com/pingcap/tiup/pkg/cluster/task/shell.go:43\n at github.com/pingcap/tiup/pk g/cluster/task.(*Serial).Execute()\n\tgithub.com/pingcap/tiup/pkg/cluster/task/task.go:86\n at github.com/pingcap/tiup/pkg/cluster/task.(*StepDisplay).Execute()\n\tgithub.com/pi ngcap/tiup/pkg/cluster/task/step.go:111\n at github.com/pingcap/tiup/pkg/cluster/task.(*Parallel).Execute.func1()\n\tgithub.com/pingcap/tiup/pkg/cluster/task/task.go:144\n at ru ntime.goexit()\n\truntime/asm_amd64.s:1650\ngithub.com/pingcap/errors.AddStack\n\tgithub.com/pingcap/errors@v0.11.5-0.20201126102027-b0a155152ca3/errors.go:174\ngithub.com/pingc ap/errors.Trace\n\tgithub.com/pingcap/errors@v0.11.5-0.20201126102027-b0a155152ca3/juju_adaptor.go:15\ngithub.com/pingcap/tiup/pkg/cluster/task.(*Shell).Execute\n\tgithub.com/pi ngcap/tiup/pkg/cluster/task/shell.go:50\ngithub.com/pingcap/tiup/pkg/cluster/task.(*Serial).Execute\n\tgithub.com/pingcap/tiup/pkg/cluster/task/task.go:86\ngithub.com/pingcap/ti up/pkg/cluster/task.(*StepDisplay).Execute\n\tgithub.com/pingcap/tiup/pkg/cluster/task/step.go:111\ngithub.com/pingcap/tiup/pkg/cluster/task.(*Parallel).Execute.func1\n\tgithub. com/pingcap/tiup/pkg/cluster/task/task.go:144\nruntime.goexit\n\truntime/asm_amd64.s:1650\nfailed to fetch cpu-arch or kernel-name”}
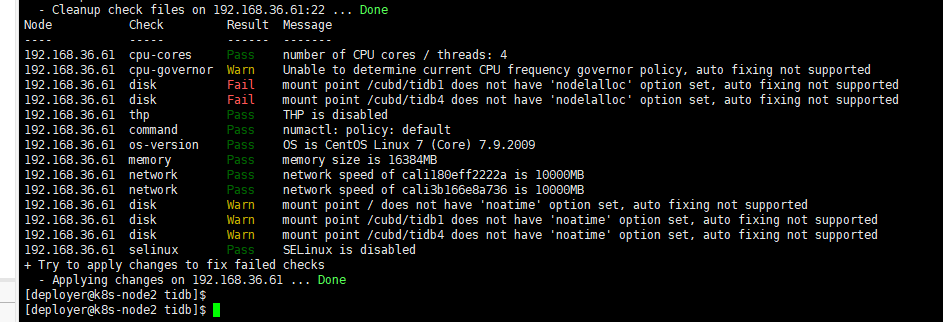
使用-p指定root权限账户和密码后,使用tiup cluster check ./topology.yaml --apply --user k8soperator -p命令来啊执行检查,发现挂载目录中不支持nodelalloc参数
does not have ‘nodelalloc’ option set, auto fixing not supported。请问大佬们如何解决呢
[deployer@k8s-node2 tidb]$ tiup cluster check ./topology.yaml --apply --user k8soperator -p
tiup is checking updates for component cluster …
Starting component cluster: /home/deployer/.tiup/components/cluster/v1.14.1/tiup-cluster check ./topology.yaml --apply --user k8soperator -p
Input SSH password:
-
Detect CPU Arch Name
- Detecting node 192.168.36.61 Arch info … Done
-
Detect CPU OS Name
- Detecting node 192.168.36.61 OS info … Done
-
Download necessary tools
- Downloading check tools for linux/amd64 … Done
-
Collect basic system information
-
Collect basic system information
- Getting system info of 192.168.36.61:22 … Done
-
Check time zone
- Checking node 192.168.36.61 … Done
-
Check system requirements
-
Check system requirements
-
Check system requirements
-
Check system requirements
- Checking node 192.168.36.61 … Done
- Checking node 192.168.36.61 … Done
- Checking node 192.168.36.61 … Done
- Checking node 192.168.36.61 … Done
- Checking node 192.168.36.61 … Done
- Checking node 192.168.36.61 … Done
- Checking node 192.168.36.61 … Done
- Checking node 192.168.36.61 … Done
- Checking node 192.168.36.61 … Done
- Checking node 192.168.36.61 … Done
- Checking node 192.168.36.61 … Done
- Checking node 192.168.36.61 … Done
- Checking node 192.168.36.61 … Done
-
Cleanup check files
- Cleanup check files on 192.168.36.61:22 … Done
Node Check Result Message
- Cleanup check files on 192.168.36.61:22 … Done
192.168.36.61 cpu-cores Pass number of CPU cores / threads: 4
192.168.36.61 cpu-governor Warn Unable to determine current CPU frequency governor policy, auto fixing not supported
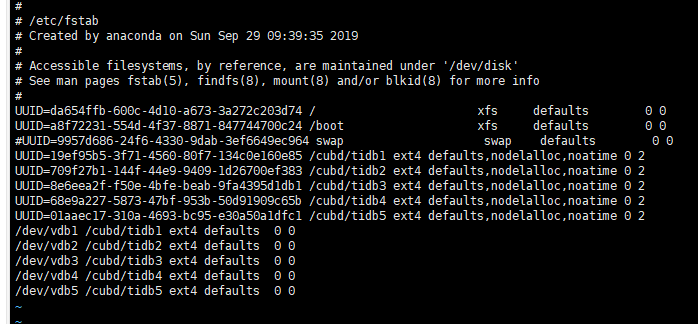
192.168.36.61 disk Fail mount point /cubd/tidb1 does not have ‘nodelalloc’ option set, auto fixing not supported
192.168.36.61 disk Fail mount point /cubd/tidb4 does not have ‘nodelalloc’ option set, auto fixing not supported
192.168.36.61 thp Pass THP is disabled
192.168.36.61 command Pass numactl: policy: default
192.168.36.61 os-version Pass OS is CentOS Linux 7 (Core) 7.9.2009
192.168.36.61 memory Pass memory size is 16384MB
192.168.36.61 network Pass network speed of cali180eff2222a is 10000MB
192.168.36.61 network Pass network speed of cali3b166e8a736 is 10000MB
192.168.36.61 disk Warn mount point / does not have ‘noatime’ option set, auto fixing not supported
192.168.36.61 disk Warn mount point /cubd/tidb1 does not have ‘noatime’ option set, auto fixing not supported
192.168.36.61 disk Warn mount point /cubd/tidb4 does not have ‘noatime’ option set, auto fixing not supported
192.168.36.61 selinux Pass SELinux is disabled
- Try to apply changes to fix failed checks
- Applying changes on 192.168.36.61 … Done
- Applying changes on 192.168.36.61 … Done
【资源配置】进入到 TiDB Dashboard -集群信息 (Cluster Info) -主机(Hosts) 截图此页面

【附件:截图/日志/监控】