作者:沈刚、梁启斌
一、背景 / 目的
从 TiDB 4.0 版本 开始,TiUP 作为新的工具,承担着包管理器的角色,管理 TiDB 生态下众多的组件,比如 TiDB、PD、TiKV 等。TiUP 中的 cluster 包可以用于替代之前 tidb-ansible 繁琐的管理步骤,,并且之前使用 tidb-ansible 管理集群的用户也可以方便将 tidb-ansible 导入到 tiup 管理之中。
本文档适用于对 TiDB 有一定运维经验,希望通过 tiup 管理并升级 3.0 集群的用户。
二、操作前的 Check 项
- 确保当前集群状态与 inventory.ini 中的拓扑一致
- 确保当前集群的各个组件运行正常
三、升级前的注意事项
3.1 查看 TiDB 的 Release Notes
以 v4.0.2 Release Notes 为例,通过Release Notes了解做了哪些优化或者修复了哪些 BUG。
3.2 升级前注意
- 注意通知业务,升级期间可能会有偶尔的性能抖动,PD Leader 升级可能会有 3s 以上业务不可用的影响;
- 注意预估升级时间 = tikv 个数 * 5 min(默认是 transfer leader 时间) + 10 min,滚动升级 TiKV 时间较长;
- 通知业务注意升级过程中在线事务失败处理;
- 最好做一次完整的数据冷备份,通过 MyDumper 导出业务库;
- 整个升级过程不支持版本回退;
- 升级操作通过中控机的 TiUP 组件完成,默认是 “tidb” 用户。
3.3 升级兼容性说明
- 不支持在升级后回退至 3.0 或更旧版本
- 3.0 之前的版本需要先通过 TiDB Ansible 升级到 3.0 版本,然后按照本文档的说明,使用 TiUP 将 TiDB Ansible 配置导入,再升级到 4.0 版本
- TiDB Ansible 配置导入到 TiUP 中管理后,不能再通过 TiDB Ansible 对集群进行操作,否则可能因元信息不一致造成冲突。
- 对于满足以下情况之一的 TiDB Ansible 部署的集群,暂不支持导入:
- 启用了 TLS 加密功能的集群
- 纯 KV 集群(没有 TiDB 实例的集群)
- 启用了 Kafka 的集群
- 启用了 Spark 的集群
- 启用了 Lightning / Importer 的集群
- 仍使用老版本 ‘push’ 的方式收集监控指标(从 3.0 默认为 ‘pull’ 模式,如果没有特意调整过则可以支持)
- 在 inventory.ini 配置文件中单独为机器的 node_exporter / blackbox_exporter 通过 node_exporter_port / blackbox_exporter_port 设置了非默认端口(在 group_vars 目录下的 all.yml 文件中统一配置的可以兼容)
- 支持 TiDB Binlog,TiCDC,TiFlash 等组件版本的升级。
3.4 目前 TiUP 不支持的功能
- 不支持修改监控告警规则,需要到具体程序目录修改
- 不支持单独对 node_exporter 和 blackbox_exporter 进行安装
- 不支持设置单独机器的 node_exporter 和 blackbox_exporter 端口,需要统一设置端口
3.5 TiDB 3.0 与 TiDB 4.0 参数差异(仅供参考)
3.5.1 参数差异
| 模块 | 3.0.5 | 4.0.5 | 备注 | PR |
|---|---|---|---|---|
| TiDB | mem-quota-query = 34359738368 | mem-quota-query = 1073741824 | 4.0 从原来的 32G 默认改成了 1G ,有可能会导致 expensive log 没有打印就 OOM 了,如果修改了 oom-action 的需要注意 | config: modify default mem_quota_query by djshow832 · Pull Request #14951 · pingcap/tidb · GitHub |
| TiDB | query-log-max-len = 2048 | query-log-max-len = 4096 | 默认值参数调整 | log: support reloading tidb-query-max-log-len after modified by fzhedu · Pull Request #12491 · pingcap/tidb · GitHub |
| TiDB | log-rotate = true | - | 本来就是 TRUE 不建议关闭 | config: remove the log-rotate config by tiancaiamao · Pull Request #12594 · pingcap/tidb · GitHub |
| TiDB | grpc-connection-count = 16 | grpc-connection-count = 4 | 默认值参数调整 | tune grpc connection count between tidb and tikv by zhangjinpeng87 · Pull Request #12884 · pingcap/tidb · GitHub |
| TiDB | max-txn-time-use = 590 | - | 取消参数,已经做兼容。不会报错 | https://github.com/pingcap/tidb/pull/12223 |
| TiDB | [local-latch] | - | 取消参数,已经做兼容。不会报错 | config: remove txn-local-latches from config file by bobotu · Pull Request #15765 · pingcap/tidb · GitHub |
| TiDB | max-stmt-count = 100 | max-stmt-count = 200 | 默认值参数调整 | https://github.com/pingcap/tidb/pull/14182 |
| PD | namespace-classifier = “table” | enable-cross-table-merge = false | 默认值的行为是一致的,如果允许跨表的 region 进行 merge 的话,需要注意这个参数的变化 | Update pd-scheduling-best-practices.md by lhy1024 · Pull Request #3437 · pingcap/docs-cn · GitHub Update README.md by lhy1024 · Pull Request #2486 · tikv/pd · GitHub |
| PD | log-rotate = true | - | 本来就是 TRUE 不建议关闭 | server: add diagnostics service by lonng · Pull Request #2024 · tikv/pd · GitHub |
| PD | tolerant-size-ratio | tolerant-size-ratio = 0 | 本来默认固定是 5, 调整为默认 0, 代表根据集群大小自动调整缓冲区大小,如果集群 region 数多,以前默认为 5 将不太适应 | https://github.com/tikv/pd/pull/1474 |
| PD | region-schedule-limit = 64 | region-schedule-limit = 2048 | 由于 store-limit 的引入和完善,不必使用 region-schedule-limit 来限制 balance 的速度,所以调整为一个比较大的值,防止这个参数造成瓶颈 | Increase the default value of region-schedule-limit by shafreeck · Pull Request #1805 · tikv/pd · GitHub |
| TIKV | scheduler-notify-capacity = 10240 | - | storage: remove storage.scheduler-notify-capacity by youjiali1995 · Pull Request #5827 · tikv/tikv · GitHub | |
| TIKV | grpc-raft-conn-num = 10 | grpc-raft-conn-num = 1 | 旧版本代码里面默认值就是 1 ,配置模板修正 | https://github.com/tikv/tikv/pull/6393 |
| TIKV | max-sub-compactions = 1 | max-sub-compactions = 3 | 默认值参数调整,增加 max_subcompaction 希望加快,在大量写入场景下加速 L0-> L1 ,减少 write stall | https://github.com/tikv/tikv/pull/5730 |
| TIKV | [rocksdb.titan] dirname = “” disable-gc = false default: 1 max-background-gc = 1 |
[rocksdb.titan] - - default: 4 max-background-gc = 4 |
titan 默认参数优化调整,隐藏一些不需要用户调整的参数 | https://github.com/tikv/tikv/pull/6269 https://github.com/tikv/tikv/pull/6555 |
| TIKV | [rocksdb.defaultcf.titan] min-gc-batch-size = “16MB” max-gc-batch-size = “64MB” sample-ratio = 0.1 merge-small-file-threshold = “8MB” |
- | 隐藏一些不需要用户调整的参数 | titan: simplify titan config in config template by yiwu-arbug · Pull Request #6269 · tikv/tikv · GitHub |
| TIKV | write-buffer-size = “128MB” | write-buffer-size = “32MB” | 在写入频繁的场景,希望减少 lockcf 里面 tomstone 的数据,减少 CPU 的消耗 | change default write buffer size of lockcf to 32MB by Little-Wallace · Pull Request #6393 · tikv/tikv · GitHub |
| TIKV | wait-for-lock-timeout = 3000 | wait-for-lock-timeout = “1s” | 悲观事务相关问题的优化 | lock_manager: update default config by youjiali1995 · Pull Request #6426 · tikv/tikv · GitHub |
| TIKV | wake-up-delay-duration = 1 | wake-up-delay-duration = “20ms” | 悲观事务相关问题的优化 | lock_manager: update default config by youjiali1995 · Pull Request #6426 · tikv/tikv · GitHub |
上表主要是列出 3.0 与 4.0 存在差异或者被取消的参数,新增的 feature 引入的参数可以参考官方文档:
3.5.2 TiDB 变量差异
| 变量名 | 原默认值 | 新默认值 | 生效版本 | 风险 |
|---|---|---|---|---|
| wait_timeout | 28800 | 0 | 3.0 | 2.x 升级 3.0 以上,会存在链接 idle 8 小时自动被断开现象 |
| max_prepared_stmt_count | 16382 | -1 | 3.0 | 2.x 升级 3.0 以上,会存在 prepare 语句太多不是释放导致不能执行 prepare 现象 |
| auto_increment_increment | 1 | 1 | 3.0.9 | |
| innodb_lock_wait_timeout | 50 | 50 | 3.0 | |
| tx_isolation | REPEATABLE-READ | REPEATABLE-READ | 4.0 | 4.0 版本在悲观事务里如果设置 READ-COMMITTED 会生效,之前不会 |
| transaction_isolation | REPEATABLE-READ | REPEATABLE-READ | 4.0 | 4.0 版本在悲观事务里如果设置 READ-COMMITTED 会生效,之前不会 |
具体变量情况以官方文档为准:TiDB 系统变量
四、操作步骤
4.1 在中控机上安装 TiUP
- 在中控机上执行如下命令安装 TiUP
curl --proto '=https' --tlsv1.2 -sSf https://tiup-mirrors.pingcap.com/install.sh sh
- 重新声明全局环境变量
source .bash_profile
- 确认 TiUP工具是否安装
which tiup
- 安装 TiUP 的 cluster 工具
tiup cluster
如果之前安装过 TiUP,使用如下命令更新至最新版本即可
tiup update --self
tiup update cluster
4.2 将 TiDB Ansible 及 inventory.ini 配置导入到 TiUP
- 通过 tiup cluster import 将 TiDB Ansible 集群导入到 TiUP 中(导入时确保当前集群的状态与 inventory.ini 中的拓扑一致,并确保集群的组件运行正常,否则导入会有异常)
假设 tidb-ansible 目录为 /home/tidb/tidb-ansible, -d 指定 tidb-ansible 目录路径
tiup cluster import -d /home/tidb/tidb-ansible
注意:
- 如果有修改过 inventory.ini 配置文件的名称,可以在 import 的时候通过 --inventory 选项指定 inventory.ini 文件名称,默认为 inventory.ini
- 如果在一个 TiDB Ansible 目录中管理多个不同的 inventory.ini 配置文件和 TiDB 集群,将其中一个集群导入 TiUP 时,需要指定 --no-backup 以避免将 Ansible 目录移动到 TiUP 管理目录下
- 如果有修改过 ansible.cfg 配置 文件名称,可以在 import 的时候通过 --ansible-config 选项指定 ansible.cfg 文件名称,默认为 ansible.cfg
- 执行导入命令后,若集群 Inventory 信息解析成功,将出现如下提示
tiup cluster import -d /home/tidb/tidb-ansible/
Found inventory file /home/tidb/tidb-ansible/inventory.ini, parsing...
Found cluster "ansible-cluster" (v3.0.12), deployed with user tidb.
Prepared to import TiDB v3.0.12 cluster ansible-cluster.
Do you want to continue? [y/N]:
- 核对解析到的集群名和版本无误后,输入 y 确认继续执行
- 若 Inventory 信息解析出错,导入过程将会终止,终止不会对原 Ansible 部署方式有任何影响,之后需要根据错误提示调整并重试
- 若 Ansible 中原集群名与 TiUP 中任一已有集群的名称重复,将会给出警示信息并提示输入一个新的集群名。因此,请注意不要重复对同一个集群执行导入,导致 TiUP 中同一个集群有多个名字
- 通过 tiup cluster display 命令验证集群导入结果
tiup cluster display <cluster-name>
4.3 编辑 TiUP 拓扑配置文件
由于导入 ansible 后,之前的配置参数会使用 4.0 默认,如果有修改配置文件的需求,可以在升级之前通过 tiup cluster edit-config 命令对集群配置进行修改。
- 进入 TiDB Ansible 的备份目录 ~/.tiup/storage/cluster/clusters/{cluster_name}/config,确认配置模板中修改过的参数。从 TiDB Ansible 中导入的集群,默认会将 tidb/pd/tikv 等配置备份在备份目录下。
- 修改集群配置
tiup cluster edit-config <cluster-name>
- 参考 topology 配置模板格式,将原集群修改过的参数填到拓扑文件中,如果是对于一类组件进行设置参数,将参数设置在 server_configs 下即可,如果想要针对某个实例调整参数,也可以在单个实例下设置参数
- 修改完成之后,通过 :wq 保存并退出编辑模式,输入 Y 确认变更
注意:如果是从 TiDB Ansible 导入进来的集群,通过 tiup cluster edit-config 的时候,不要将 imported:true 配置去掉,该配置为标识是否是从 TiDB Ansible 导入的集群,如果去掉可能会导致 tiup 管理集群出错。
4.4 滚动升级 TiDB 集群
- 通过 tiup cluster upgrade 命令升级集群
tiup cluster upgrade <cluster-name> <version>
以升级到 v4.0.2 版本为例
tiup cluster upgrade <cluster-name> v4.0.2
滚动升级会逐个升级所有的组件。升级 TiKV 期间,会逐个将 TiKV 上的所有 leader 切走再停止该 TiKV 实例。默认超时时间为 5 分钟,超过后会直接停止实例。
如果不希望驱逐 leader,而希望立刻升级,可以在上述命令中指定 --force,该方式会造成性能抖动,不会造成数据损失。
如果希望保持性能稳定,则需要保证 TiKV 上的所有 leader 驱逐完成后再停止该 TiKV 实例,可以指定 --transfer-timeout 为一个超大值,如 --transfer-timeout 100000000,单位为 s。
- 通过 tiup cluster display 命令查看集群状态
tiup cluster display <cluster-name>
Starting /home/tidblk/.tiup/components/cluster/v1.0.0/cluster display <cluster-name>
TiDB Cluster: <cluster-name>
TiDB Version: v4.0.2
……
检查 TiDB Version 显示为目标升级版本以及各个实例的 Status 显示为 Up 或 Healthy 表示集群状态正常
五、操作后 Check 监控项
登录 Grafana 页面 http://{grafana-ip}:{grafana-port}
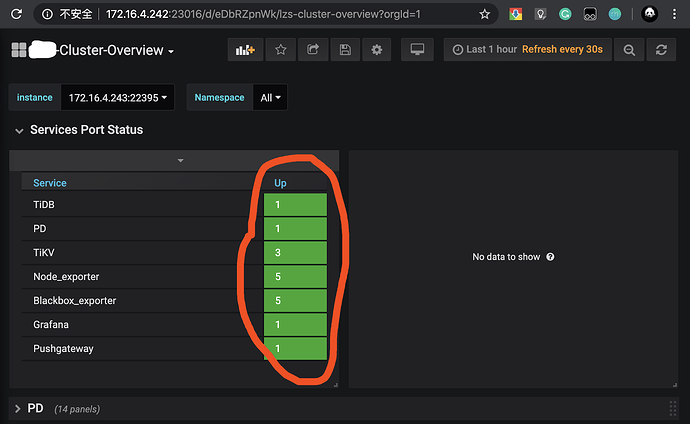
- 查看 overview 页面, Overview 页面的 Services Port Status 状态是否均为绿色的 up 状态;
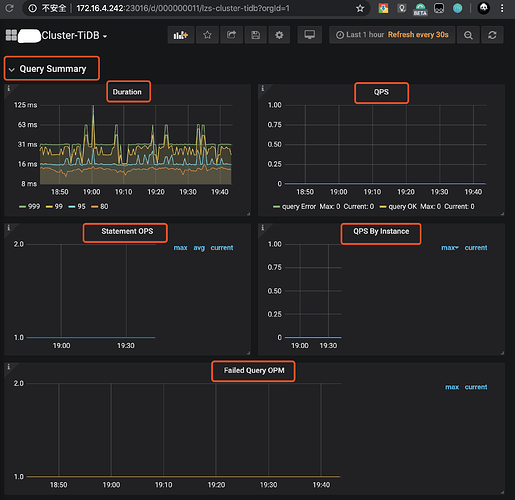
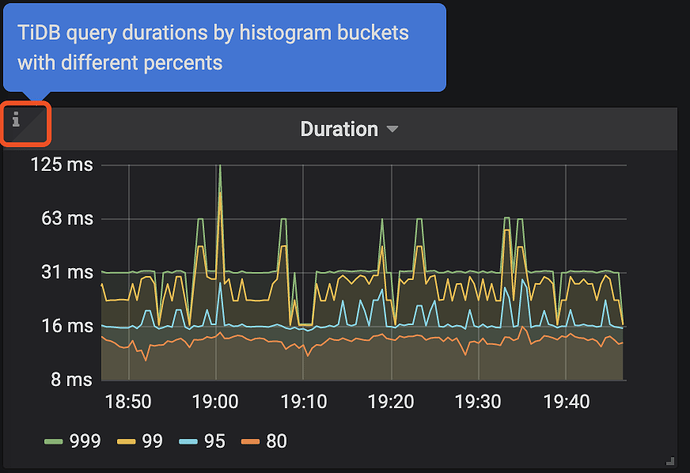
- 查看 TiDB 页面, Query Summary 监控栏的 Duration、QPS、Statement OPS、QPS By Instance、Failed Query OPM 监控项是否正常,在每个监控项左上↖️都会有一个
“i”光标放在那里会描述监控项的解释和预期情况;
- 新的 TiKV 相关监控数据主要会展示在 TiKV-Details、TiKV-Summary、TiKV-Trouble-Shooting 中。可以查看 TiKV-Details 页面,通过 Cluster、Error、Server 确认 TiKV 实例的状态的负载以及错误情况。
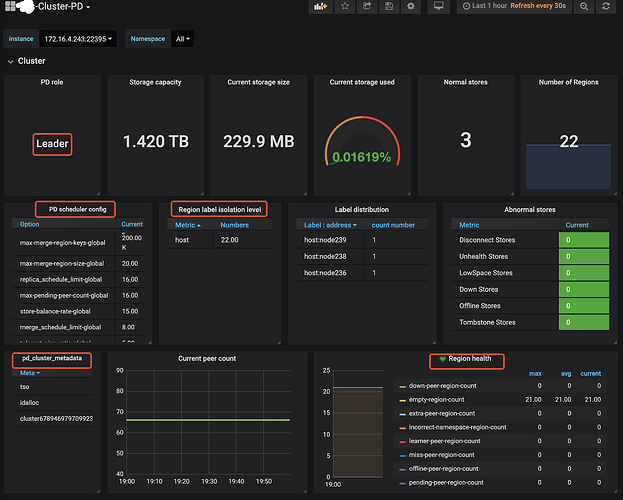
- 查看 PD 页面,查看 Cluster 监控栏中的 Storage capacity、Current storage size、Current stroage used、Normal stores、Number of Regions 确认当前集群存储数据和 Region 的情况。
六、离线环境升级
TiUP 目前也支持离线环境管理 TiDB 集群,需要搭建离线镜像环境,然后就可以按照在线环境方式使用 tiup。
6.1 准备 TiUP 离线组件包
方式一:通过官方下载页面,选择对应版本的离线镜像包,下载地址:https://pingcap.com/download-cn/
方式二:使用 tiup mirror clone 命令手动打包离线组件包
- 找一台可以连接外网的服务器,安装 TiUP 包管理工具
curl --proto '=https' --tlsv1.2 -sSf https://tiup-mirrors.pingcap.com/install.sh sh
source .bash_profile
which tiup
- 在可以连接外网服务器上,拉取需要的组件
tiup mirror clone tidb-community-server-${version}-linux-amd64 ${version} --os=linux --arch=${arch}
例如需要制作 x86 平台 v4.0.2 版本的离线镜像,可以执行以下命令
tiup mirror clone tidb-community-server-v4.0.2-linux-amd64 v4.0.2 --os=linux --arch=amd64
例如需要制作 ARM 平台 v4.0.2 版本的离线镜像,可以执行以下命令
tiup mirror clone tidb-community-server-v4.0.2-linux-amd64 v4.0.2 --os=linux --arch=arm64
该命令会在当前目录下创建一个名为 tidb-community-server-${version}-linux-amd64 的目录,里面包含 TiUP 管理的组件包
- 打包该组件包并上传至离线环境中控机
tar czvf tidb-community-server-${version}-linux-amd64.tar.gz tidb-community-server-${version}-linux-amd64
6.2 部署离线环境 TiUP 组件
如果是下载的社区版离线镜像包
tar xzvf tidb-community-server-${version}-linux-amd64.tar.gz &&
sh tidb-community-server-${version}-linux-amd64/local_install.sh
source /home/tidb/.bash_profile
如果是下载的企业版离线镜像包
tar xzvf tidb-enterprise-server-${version}-linux-amd64.tar.gz &&
sh tidb-enterprise-server-${version}-linux-amd64/local_install.sh
source /home/tidb/.bash_profile
6.3 升级集群
参照 4.2-4.3 小节内容对集群进行升级操作。
七、周边工具升级
7.1 tidb-binlog 升级
目前 TiUP 已经支持 Binlog 的管理,所以通过 TiUP 导入的 TiDB Ansible 集群,在升级 TiDB 集群时会同时升级 Binlog。
八、升级常见问题
8.1 TiUP 导入 TiDB Ansible 导入报错
Error: remove /home/tidb/tidb-ansible: directory not empty
该报错为导入 TiDB Ansible 时,在最后备份 TiDB Ansible 目录时,备份目录失败的报错。可能是目录中存在用户额外放入的其他文件或者文件夹。如果 tiup cluster display 显示集群状态正常,那说明导入已经成功了,可以忽略这个错误。
Error: read /home/tidb/tidb-test/tidb-ansible-3.0.14: is a directory
该错误与 directory not empty 的错误类似,如果 tiup cluster display 显示正常,可以忽略。
8.2 使用 TiUP 报 Error: manifest has expired at: 2020-06-27T03:35:25Z
已知 BUG ,在早期 tiup 版本会出现,后续版本已经修改
解决方案:
rm -rf ~/.tiup/manifests/*
注意清空是 manifests 目录不是 manifest 目录
tiup update --self
tiup update cluster
8.3 升级之后系统性能下降
通过慢日志确认升级前后是否有执行计划变动,如果有执行计划变动的情况,可以手动收集一下统计信息
九、相关案例
Asktug 问题


